FlashView Manual
Complete reference
Version 1.8.8
1 Your first folder
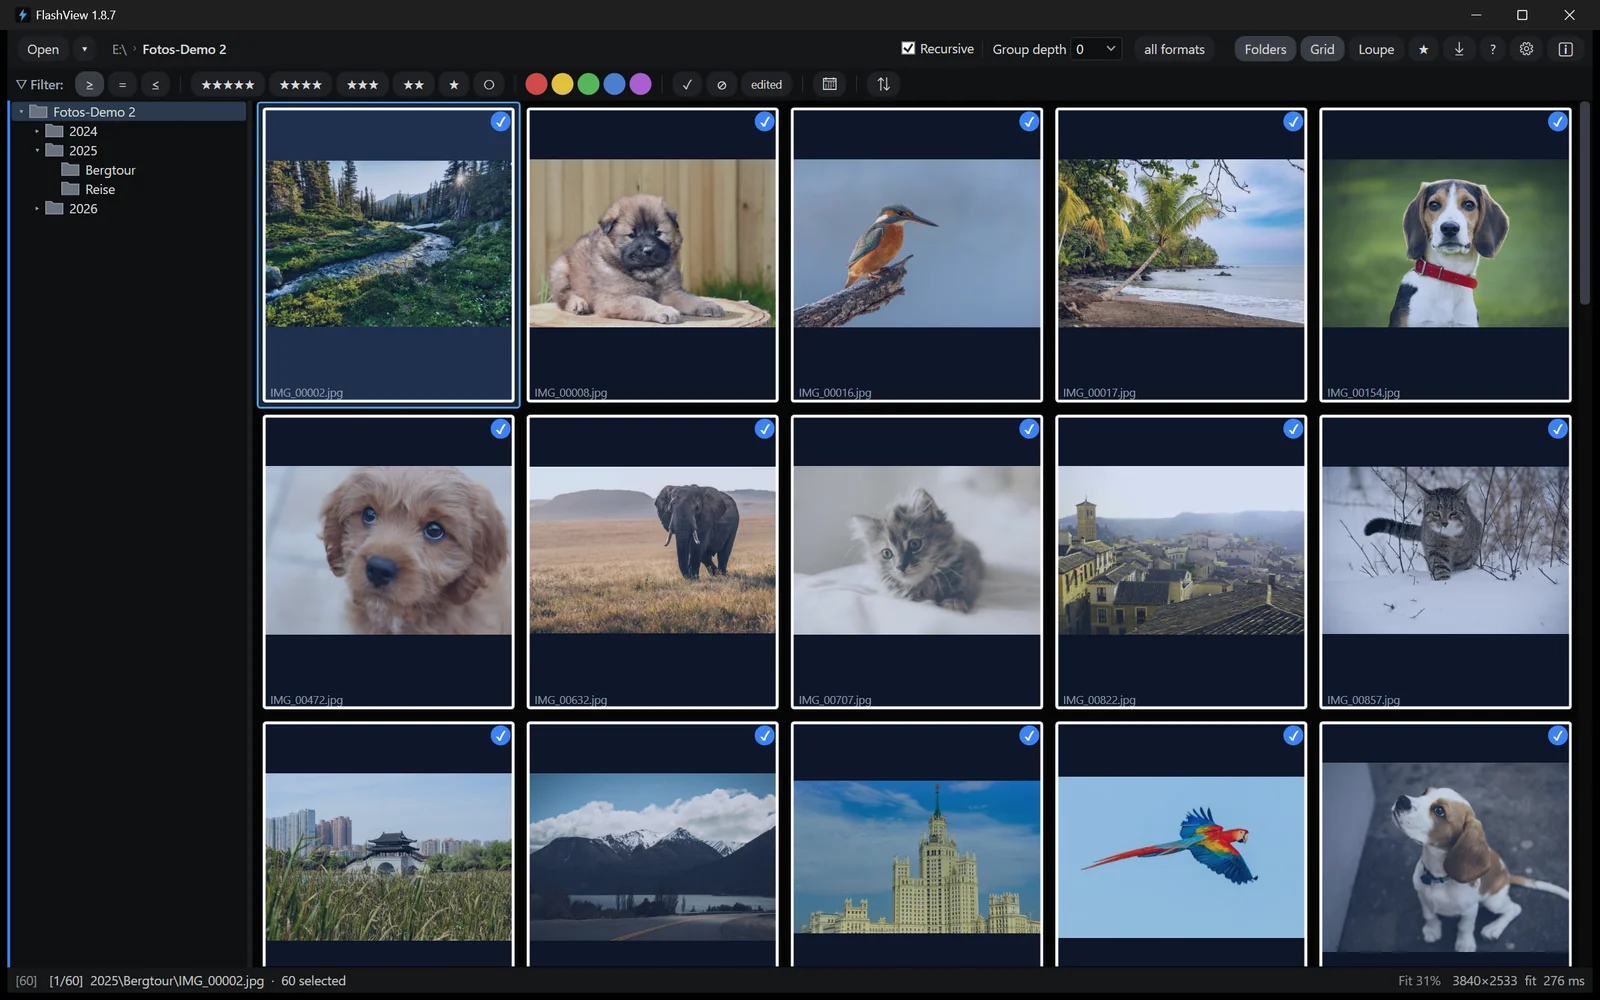
FlashView is a fast image viewer for Windows. Point it at a folder and the pictures are there - and you can page through them without waiting, even with tens of thousands of files.
The speed comes from what FlashView leaves out. There is no library, no catalog and no import step: you point at a folder and you see it.
That's also why it makes sense to point it at the top of your archive. Open Photos,
switch on Recursive, and twenty years sit in front of you as a single surface,
grouped by year and scrollable in one go. Hardly any other program offers that,
because they all want to build a catalog first. And because browsing costs you
nothing, hunting for one picture turns into wandering: you start at a year and two
minutes later you're in a shoot you hadn't thought about for ages.
Everything else builds on that. You look at your pictures, give them stars and color labels, sort out the failures - and what you decide is written as standard XMP right next to the images, ready to be read by Lightroom, Bridge or Capture One.
Opening a folder
Three ways in:
- Open in the toolbar, or Ctrl+O.
- The small arrow next to it lists the folders you opened recently.
- From Explorer: right-click an image, Open with, FlashView. The picture comes up full size straight away.
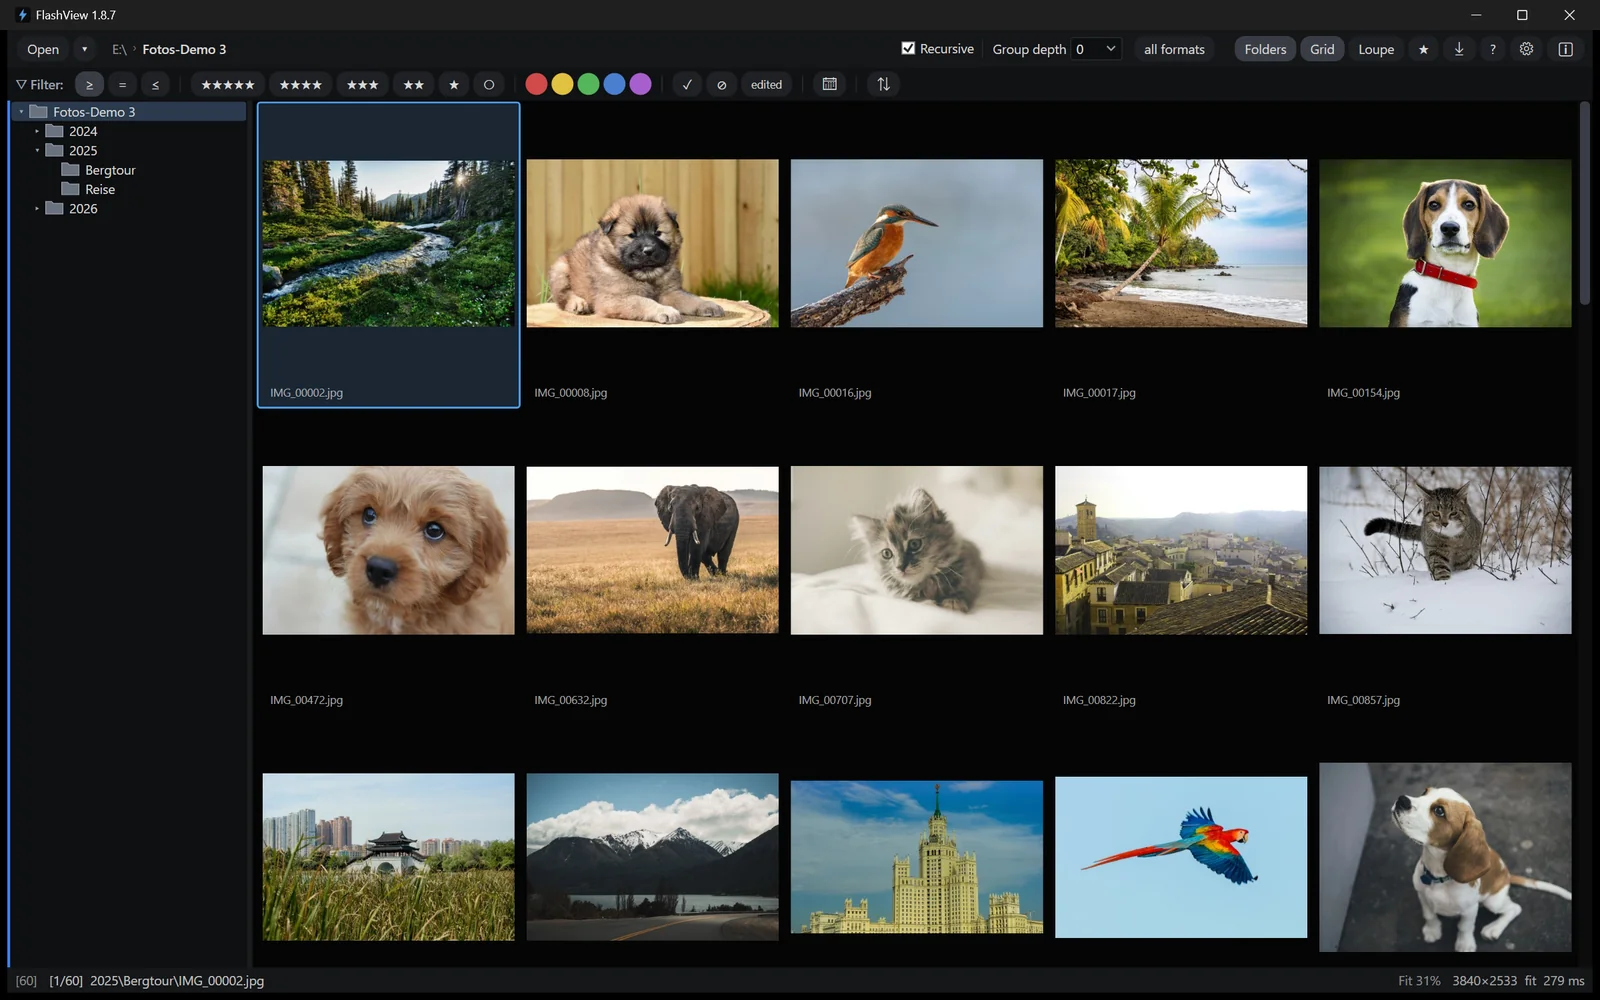
The folder is there immediately, however many pictures are in it. The thumbnails are usually ready too by the time you scroll to them, because FlashView loads ahead in both directions. Only if you race down through a folder it has never seen before will you watch them catch up.
Making FlashView your default for images
For FlashView to show up in the Open with menu it has to be registered once: either during installation, via the Register as image viewer checkbox, or later under File associations in the settings with Register. That applies to your Windows account; on a shared PC everyone has to do it for themselves.
After that you can set FlashView as the default app for JPEG in Windows - then a double-click in Explorer is the shortest route to your picture.
Two views
The interface stays out of the way: dark background, one toolbar, and otherwise picture. Anything you don't need, you hide - the folder tree, the rating bar, the shot data and the histogram all switch on and off individually.
FlashView has three modes, and one key each to reach them. They sit side by side in the toolbar, and exactly one is always highlighted - so you can see where you are at any moment.
| Mode | Key | What for |
|---|---|---|
| Grid | G | overview of everything in the folder |
| Loupe | L | one picture, filling the window |
| Edit | E | the same picture, plus tools and sliders |
The first two are for looking through your pictures. Edit is the workbench for a single picture - it's covered in Editing.
There's also fullscreen on F: it takes away the window frame and the taskbar so FlashView gets the whole screen. That isn't another mode - it cuts across all three; the toolbars and tools stay, you simply have more room. There's more on it in Showing your work.
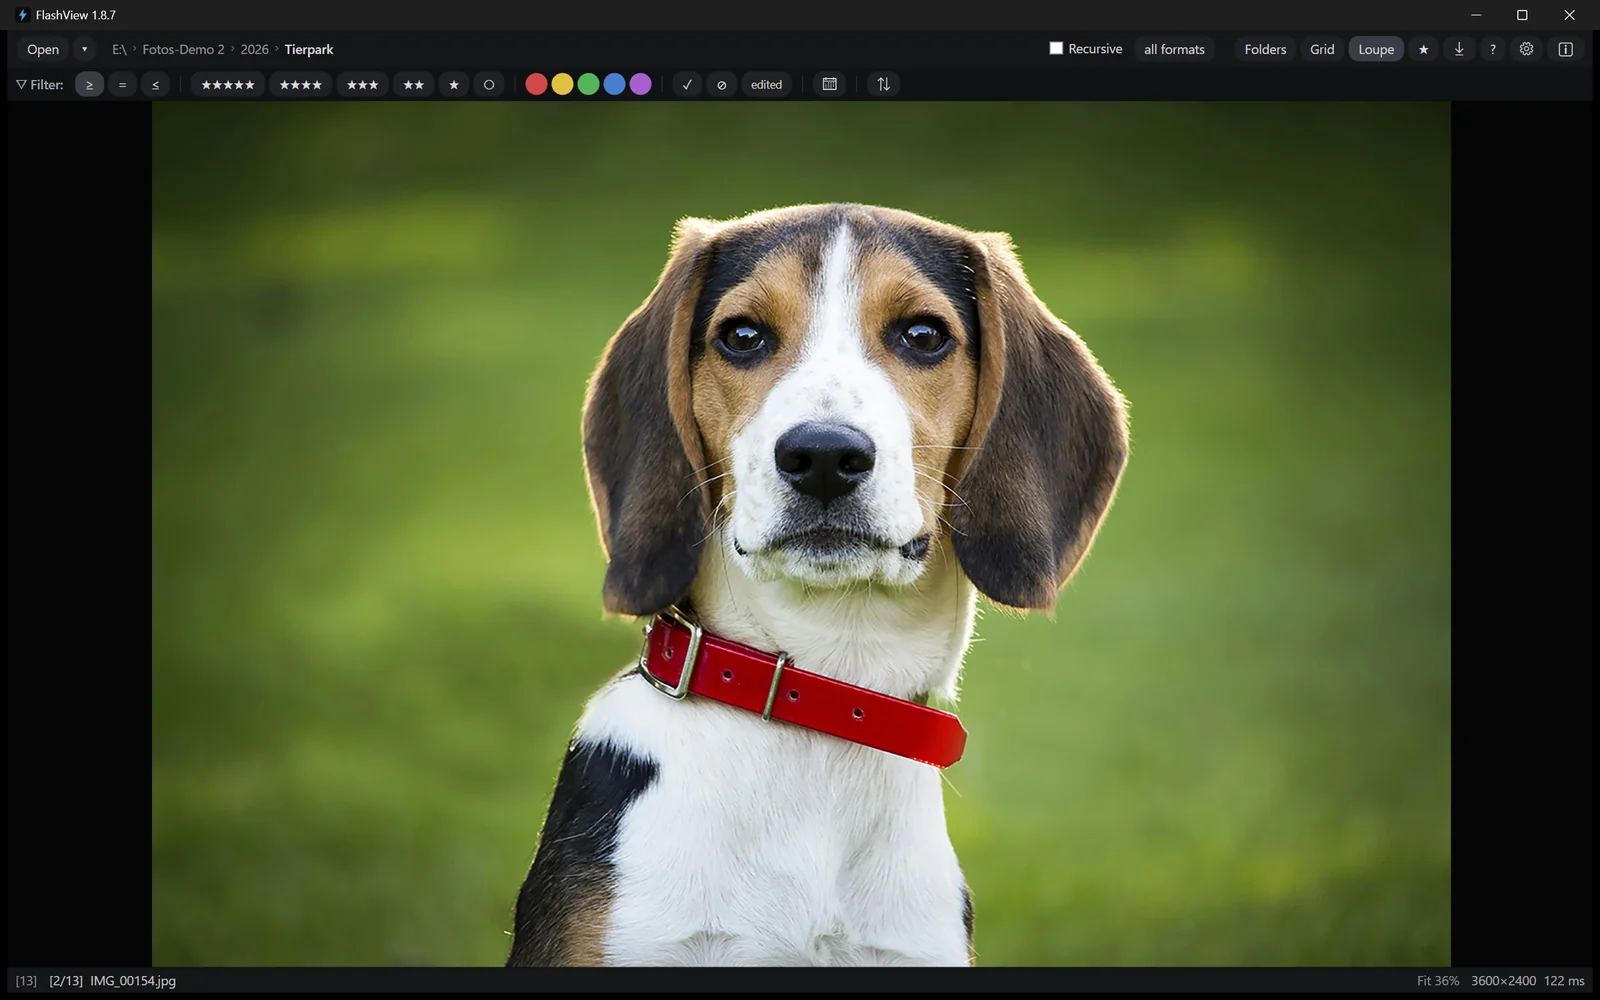
Switching costs nothing. If you can't tell about a picture, look at it in the loupe and go straight back - that's quicker than squinting at a thumbnail.
Esc steps back one level each time: out of fullscreen into the window, out of the loupe into the grid. In the grid, Esc first clears any selection.
In the loupe the mouse pointer disappears after two seconds of stillness. It comes back as soon as you move the mouse.
Paging through
← and → move to the previous and next image, in both views. Home jumps to the first picture in the folder, End to the last.
The scroll wheel does the obvious thing in each place: it scrolls the grid and changes the picture in the loupe.
In the loupe the next image is simply there. You can work through a whole series without the program slowing you down - which is the entire point when there's a lot to get through.
Bigger or smaller tiles
Hold Ctrl and turn the scroll wheel to change the number of columns in the grid: fewer columns means bigger tiles, more columns fits more on screen. Handy when you skim a series first and then want a closer look. The same setting lives in the grid's context menu.
The folder tree
Your archive sits on the left as a tree. Click a folder and you see its pictures, without opening anything again.
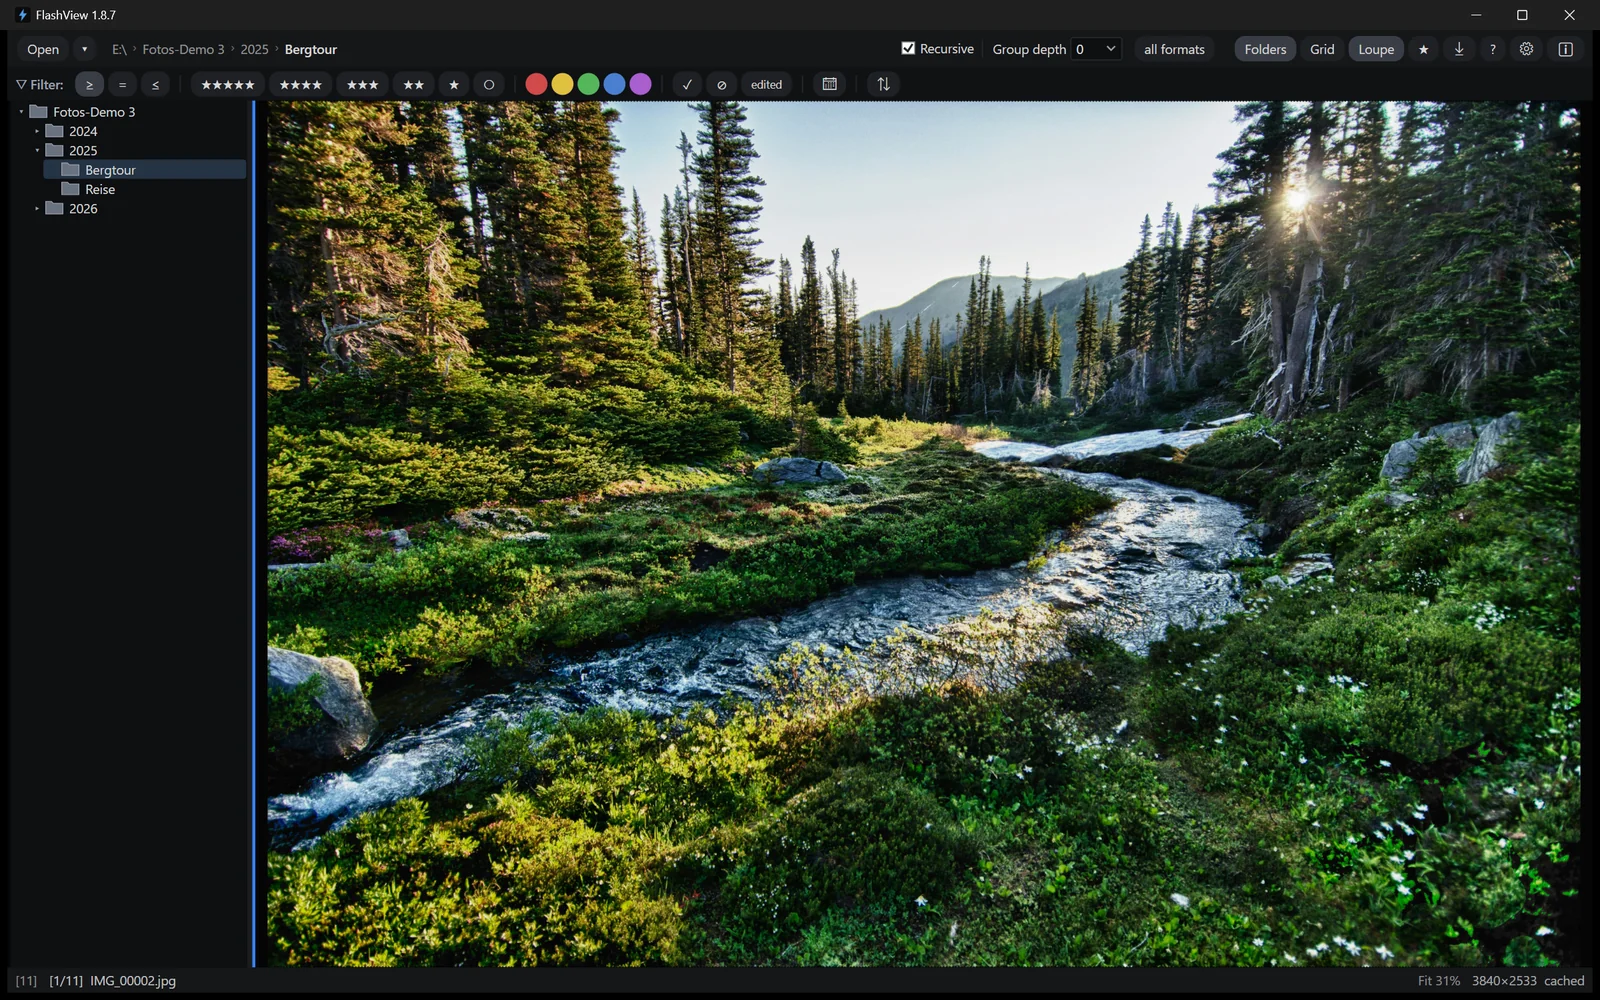
Two keys drive it:
- Shift+T shows and hides the tree.
- T puts the keyboard focus into it, so you can walk through your folders with the arrow keys.
One detail that surprises people at first: FlashView remembers separately whether the tree should be visible in the grid and in the loupe. In the grid it's on by default, in the loupe it's off - there the space belongs to the picture. Both settings stick until you change them.
Between folders and pictures without the mouse
Tab switches the keyboard focus between the folder tree and the image area. Together with G and L for the view, that takes you through an entire culling session without ever leaving the keyboard.
What FlashView remembers per folder
Sort order, the recursive switch, the group depth and the picture you were last looking at are remembered for each folder separately. Come back, and you find it the way you left it.
Everything is saved when you switch folders and when you quit.
A picture you clicked always gets shown
Start FlashView from Explorer with a picture that a saved filter would normally hide, and FlashView drops the filters for that session and shows you your picture - because someone who clicks an image wants to see that image. Your saved folder settings aren't touched: open the folder normally next time and the filter is back.
2 Folders, subfolders and groups
Photographs rarely live in one folder. Usually there's a structure by year and date, and depending on what you're after you want to see a single shoot or the whole lot at once. Two switches in the toolbar handle that, and they get confused for each other all the time.
This folder only, or everything below it
Recursive decides which pictures make it into the grid at all: just the ones sitting directly in the selected folder, or those in every subfolder as well.
The selected folder is always whichever one is highlighted in the tree. That can be your top-level folder or something deep inside it - click a shoot in the tree and everything that follows applies to that shoot.
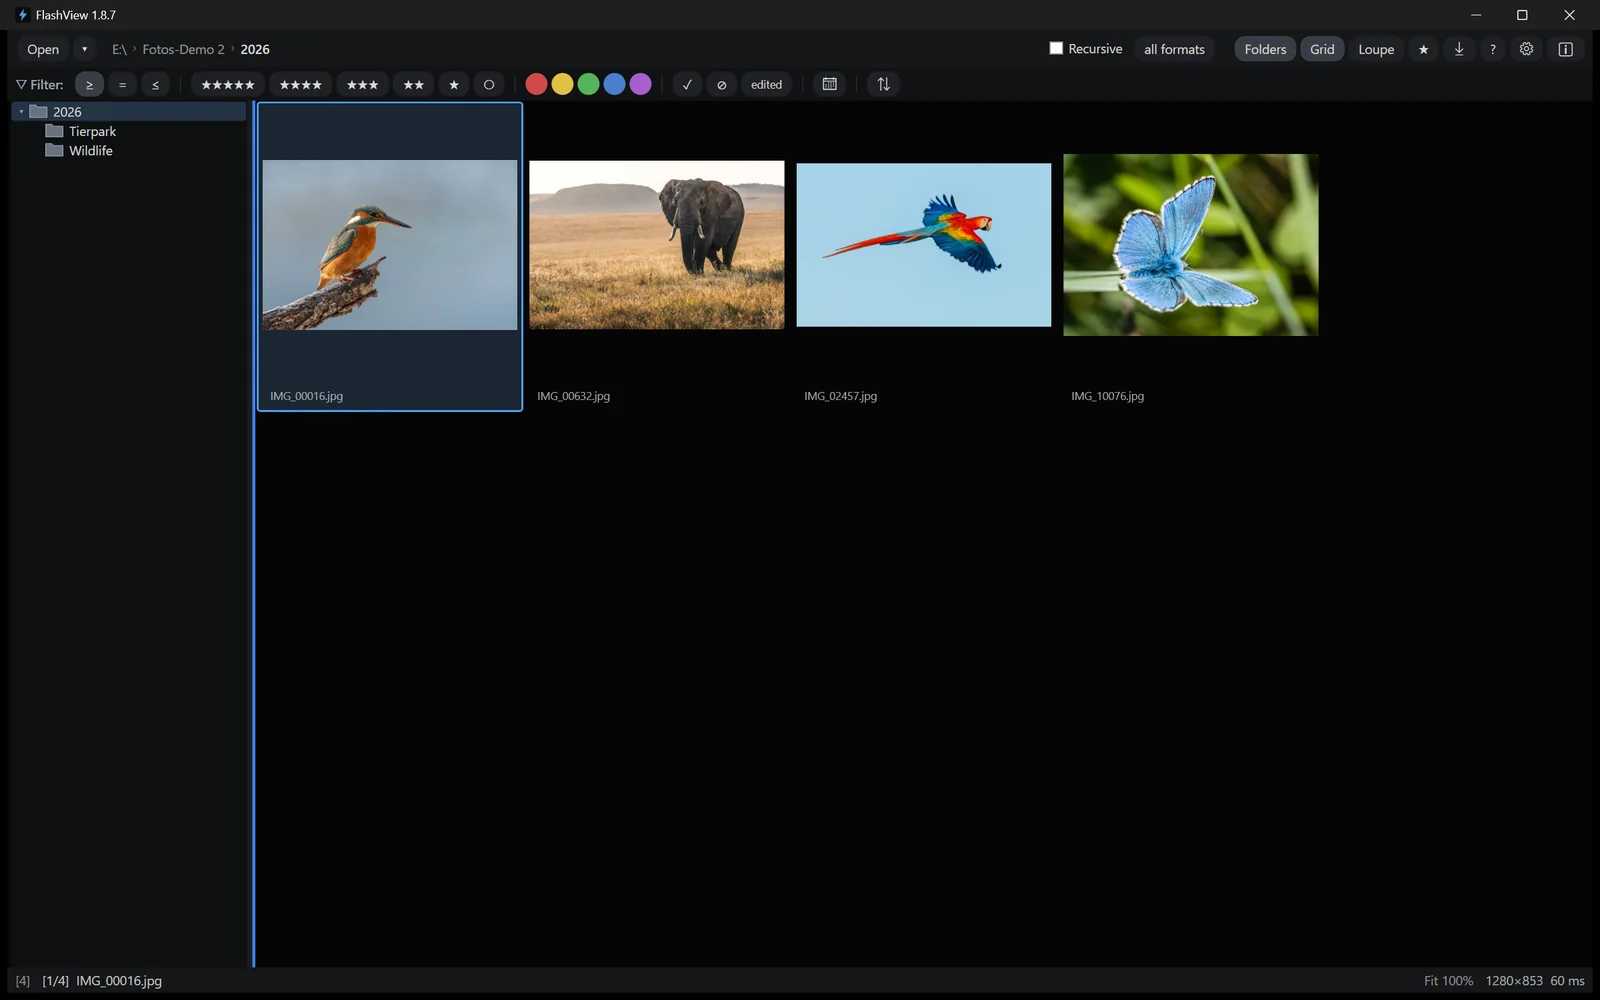
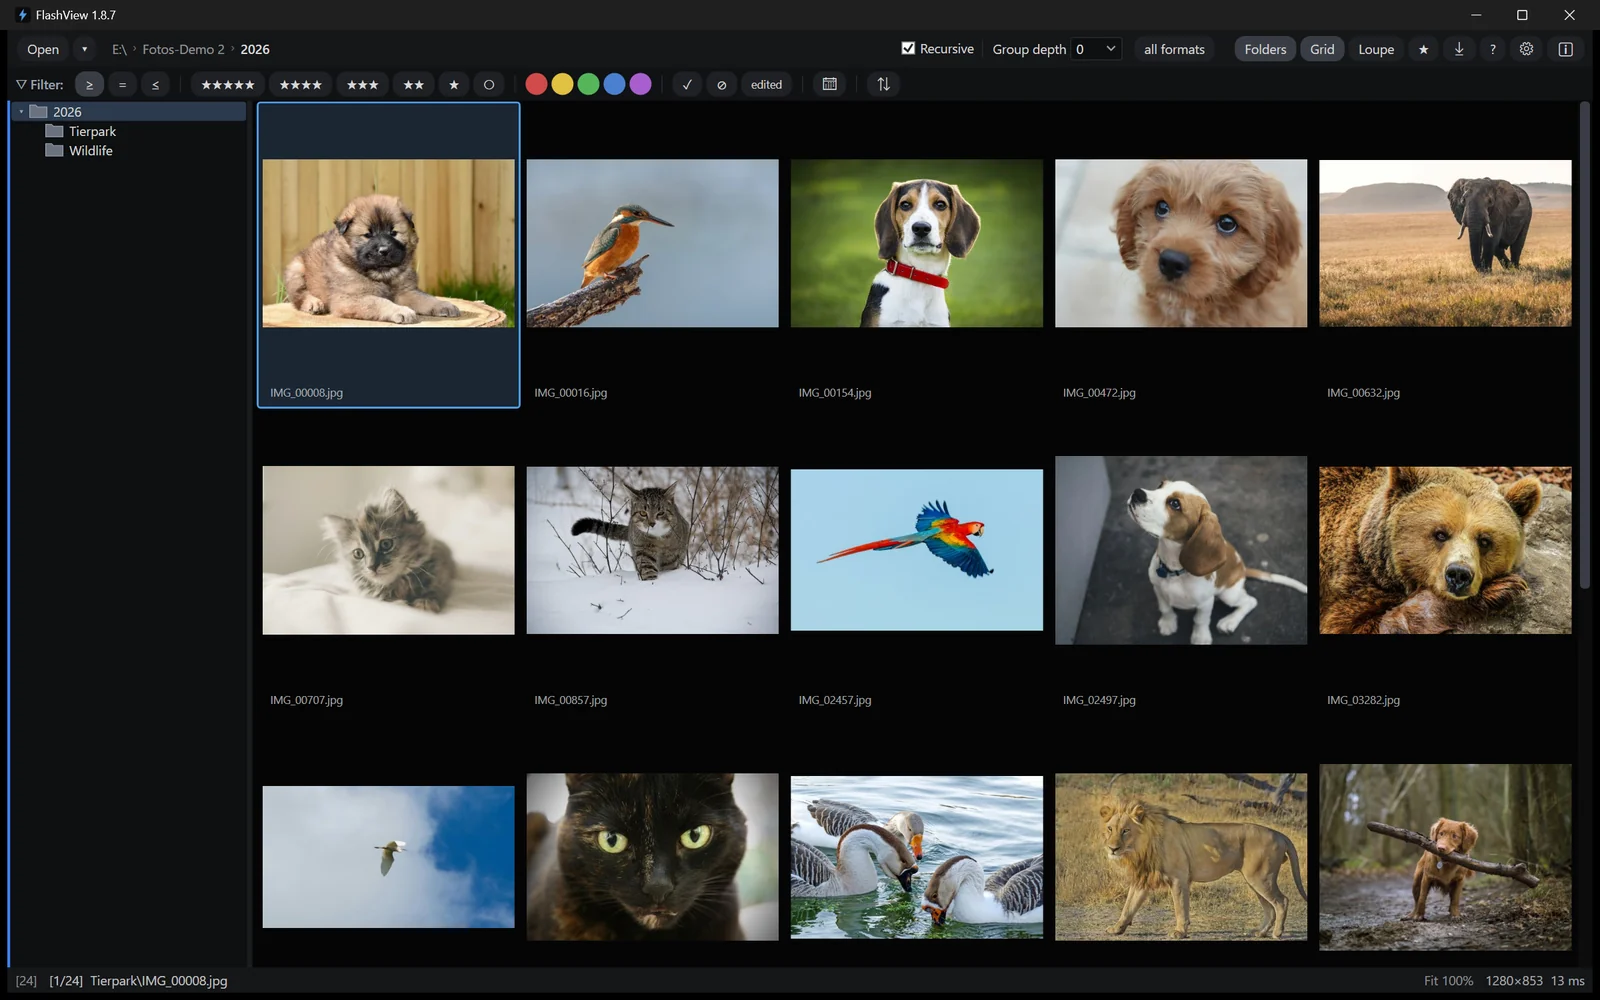
Toggle it with the Recursive checkbox or with Shift+R. The setting applies per folder and sticks until you change it.
The folders FlashView leaves out
Two kinds of subfolder are passed over: those whose name begins with a dot, and those Windows marks as hidden or system. They don't appear in the folder tree, and their pictures don't count towards Recursive either.
That's the answer when a number below the grid doesn't match your own arithmetic.
Folders like .thumbnails, .picasaoriginals or .git are other programs'
storage - thumbnails and backup copies, not photographs. If you do need to get at
one, open it directly as your top-level folder.
Group depth
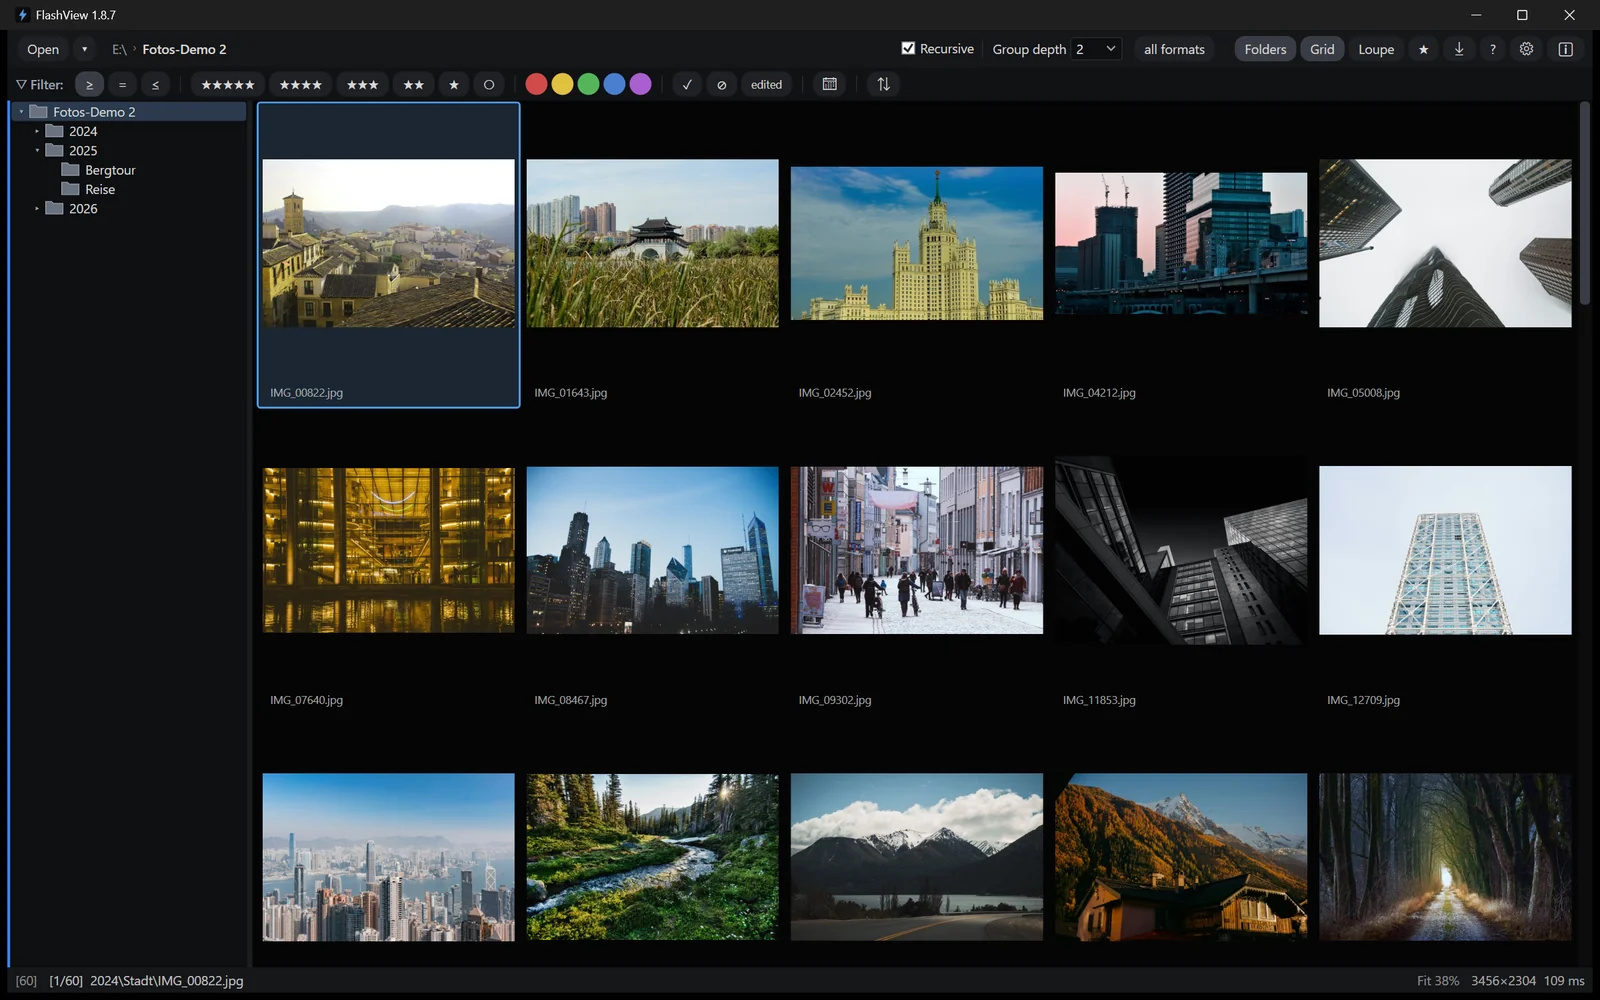
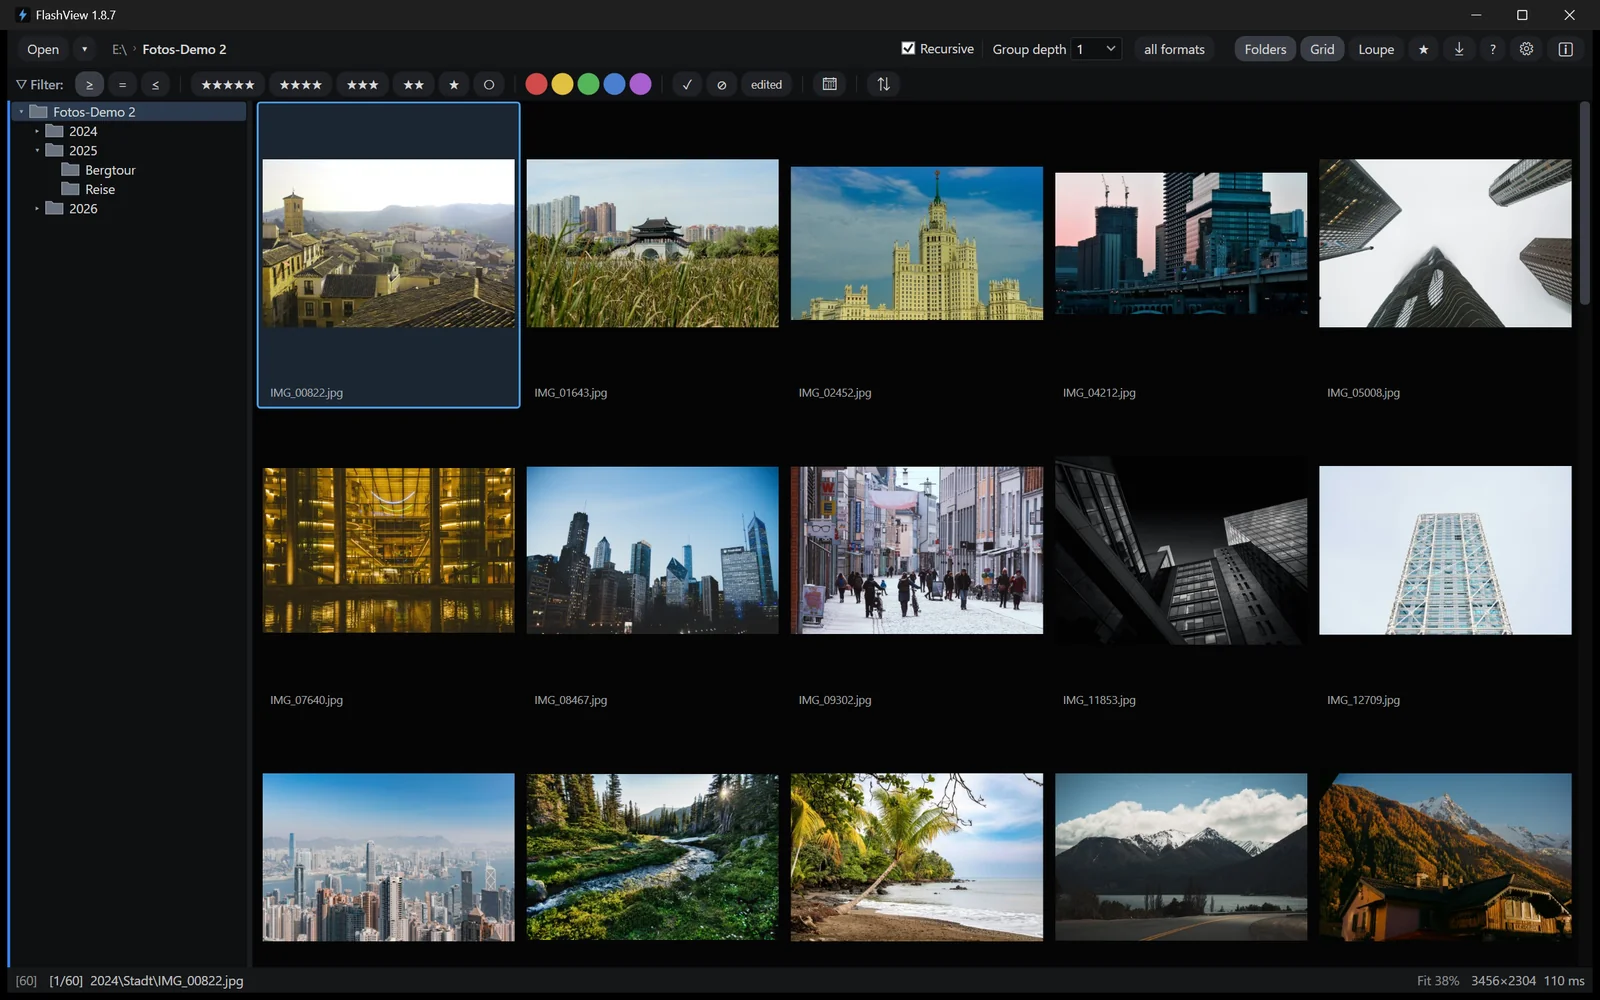
As soon as pictures from several folders come together, the question is how to arrange them. That's what Group depth controls. It counts how many folder levels below the selected folder make up a group.
Say you've selected Photos, and 2026/Zoo sits underneath.
| Depth | Groups | Result |
|---|---|---|
| 0 | none | every picture in one continuous run |
| 1 | 2026 |
one block per year |
| 2 | 2026/Zoo |
one block per shoot |
Finding your picture of the year
This is what depth 1 is for. At depth 2 you go shoot by shoot and only ever compare within one session. Switch to depth 1 and every shoot of that year stands side by side - and it becomes obvious which frames really stand out. Back to 2 when you want to cull again.
Two switches, two jobs
People mix them up, but they do different things:
- Recursive decides which pictures you see.
- Group depth decides how they're arranged.
Without recursive there's only one folder, so there's nothing to group and the group depth has nothing to do. The other way round works fine: go recursive and set the depth to 0, and you see everything in a single run.
Rating, color and size always sort across everything
Sort by stars, color label or file size and the group depth is ignored - the order then runs across all your pictures. That's deliberate: a shortlist should show the best pictures, not the best ones per folder. Sort by name or date and the groups work as normal.
3 Zoom and checking focus
Whether a picture is genuinely sharp isn't something you decide from a thumbnail. You have to get into the image, and at the spot that matters - usually the eyes.
One click is enough
In the loupe a single click zooms to 1:1, meaning a hundred percent. Where you click matters: the spot you clicked stays under the pointer. Click an eye and you're looking at that eye - no zooming first and then hunting for it.
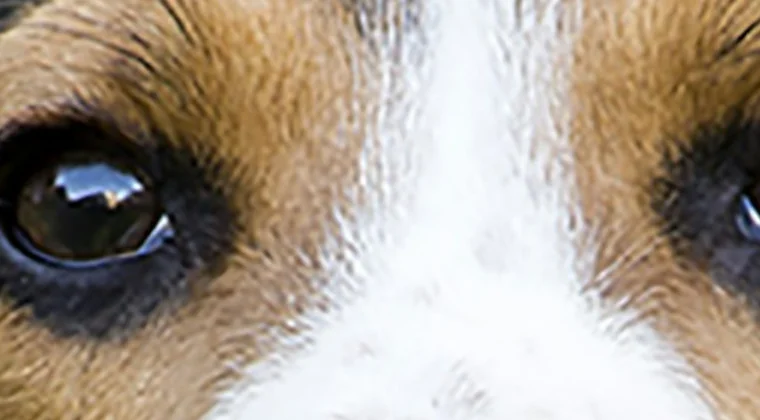
A double-click returns you to the grid. So does Esc, as long as you haven't zoomed in.
For finer control there's Ctrl+scroll, which steps through fixed levels from 6.25 % to 800 %. Without Ctrl the wheel changes the picture as usual.
Small pictures aren't blown up
The fitted view never enlarges beyond an image's actual size. An 800-pixel image won't fill your screen, because all that would achieve is a soft, stretched picture. You can still zoom, within whatever the file has to offer.
What happens behind the scenes
What you see first is always a screen-sized version - that's all the fitted view needs, and it's why paging is so quick.
When the full resolution joins in depends on the format:
- JPEG: only once you zoom to a hundred percent or beyond. Before that it would be wasted work.
- RAW: right away, without you doing anything. Zoom in and the real pixels are usually already there.
The framing stays put when it switches over; nothing jumps.
Staying zoomed in while you page
Working through a series, you often want to check the same spot on several frames: which of these eight is sharp on the eye? Normally FlashView returns to the fitted view every time you change picture.
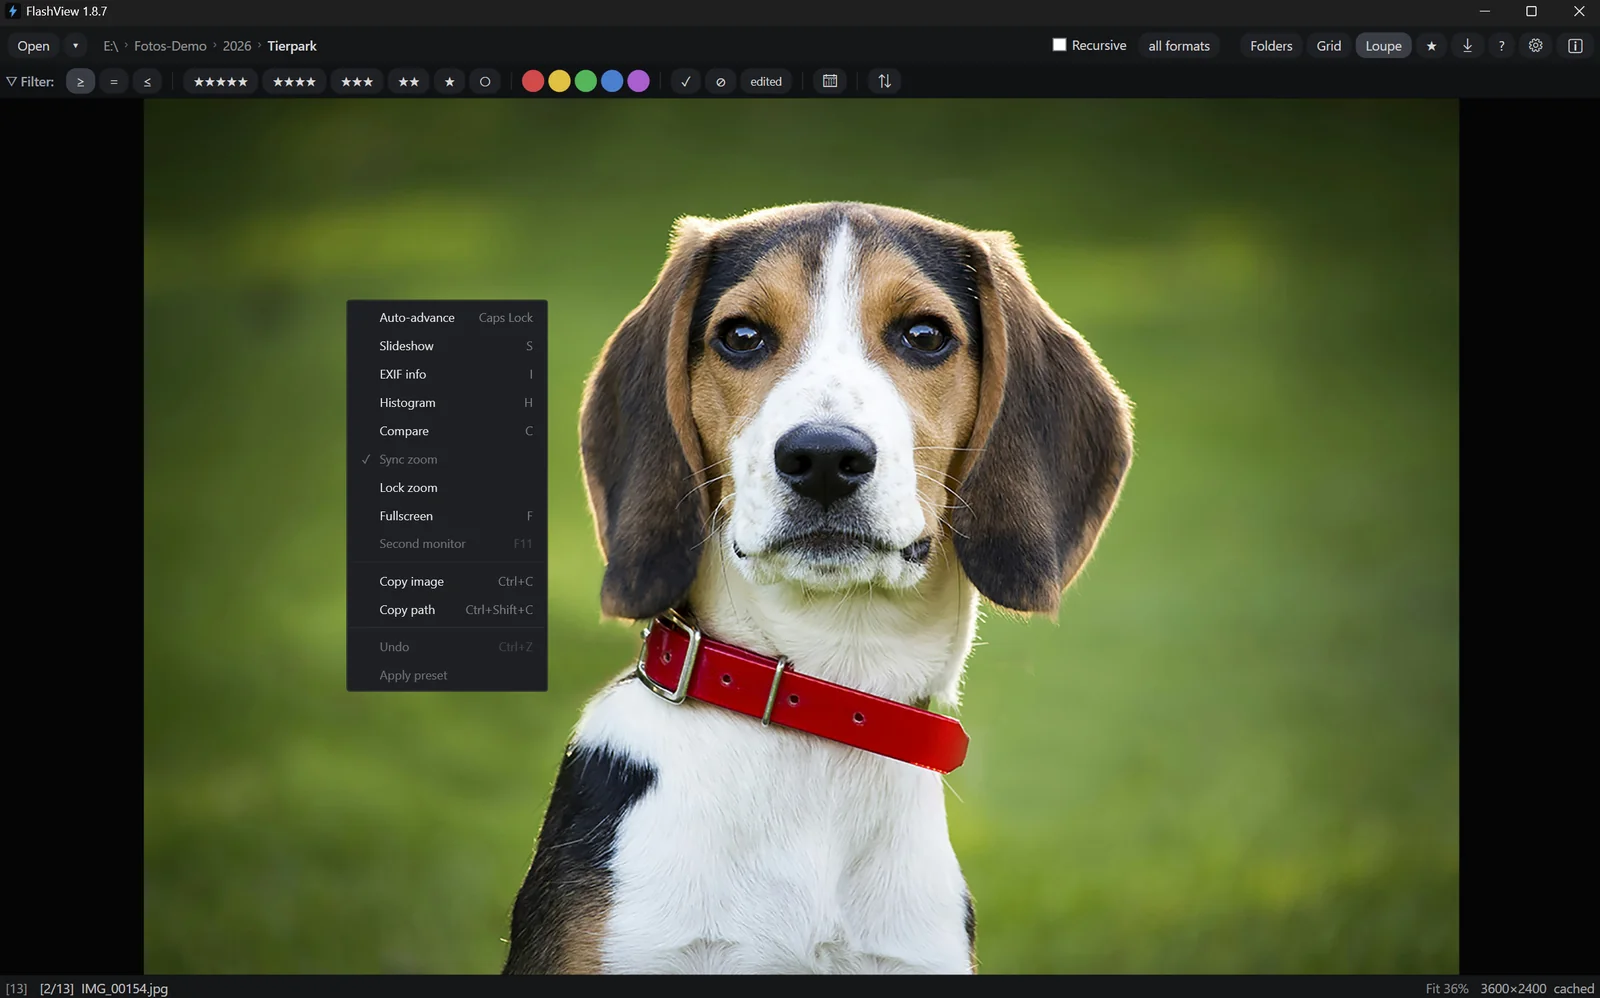
With the zoom locked you stay on the same detail while you click through the series - one frame after another at the same spot, which is the fastest way through a burst.
If you'd rather see two frames side by side, that's what Compare on C is for. The two complement each other: locked zoom for a quick pass through many pictures, compare for the decision between the two that are left.
The setting sticks until you switch it off again. It's off by default, because when you're just looking through pictures you want to see the whole frame.
Mixed portrait and landscape
FlashView keeps two positions, one for landscape and one for portrait. Page through a mixed series and you land at the right spot in every frame, instead of having to find it again each time the orientation changes.
4 Metadata and histogram
While you're culling, the picture is all you need. When you start judging it, what the camera recorded helps - and so does the way the brightness and colors are distributed.
The EXIF panel
I brings up the shot data in the loupe.
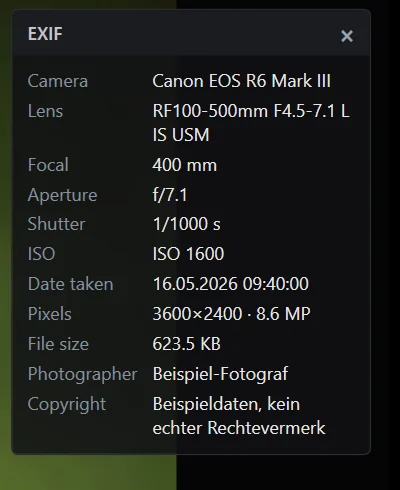
You get camera and lens, focal length, aperture, shutter speed and ISO, plus date taken and file date, image size, file size, and the artist and copyright fields where the camera fills them in.
Three of those don't come from the camera data at all: file date, file size and image size come from the file system and from the picture itself. They're here anyway because sorting and filtering rely on them - which is why a picture without any EXIF at all still shows you something.
Date taken and file date drift apart
The date taken is what the camera wrote when you pressed the shutter. The file date is the file's timestamp on disk - and that moves the moment you copy or import from a card. After an import it's the day of the import, not the day of the shoot.
That explains the most common puzzlement about the order in the grid. Both values are on offer in the sort options too, under the same names - File date and Capture date - so you get what it says on the tin. Two things are worth knowing anyway: the date filter always goes by the file date, however you have sorted. And sorting by Capture date falls back to a picture's file date if it hasn't got one, because otherwise it would have no place in the order.
Left alone, the panel settles between the histogram and the editing panel. If it covers the part of the picture you want to look at, drag it aside with the mouse and it stays there. After that it stops arranging itself alongside the others.
Filtering by camera, lens or ISO
The panel shows the current picture's data and is always available. If you also want to filter by those values or sort by capture date, switch on Enable EXIF sort & filter in the settings.
It costs you nothing in speed: FlashView picks the values up during the scan that's running anyway. It's still off by default, because it only matters to photographers who care about that sort of thing.
The histogram
H brings up the histogram, again in the loupe.

The colored area is the three color channels laid over each other: where all three overlap it turns white. The white line above them is the luminance distribution.
Black is on the left, white on the right. If the mass sits against the left edge the picture is dark or underexposed; against the right edge, the highlights are blown.
Watch the ends, not the shape
There is no such thing as a correct histogram. A night shot belongs on the left, a snowfield on the right. Only the two ends tell you anything: a vertical spike hard against either edge means detail has been lost there. That's exactly why the colored area is deliberately not smoothed - a spike at black or white should stay visible rather than being averaged away.
The histogram is calculated alongside everything else and doesn't slow your paging down. It sits underneath the EXIF panel and lets clicks through, so you can zoom or open the context menu straight through it without switching it off first.
FlashView remembers both panels: whatever you had switched on is back next time you start.
5 Showing your work
Looking at pictures is one thing; showing them to someone is another. Three features exist for exactly that - at a client meeting, when a series is being signed off, or simply when somebody is sitting next to you.
Fullscreen
F puts the window into fullscreen: FlashView takes the whole screen, without a window frame or the taskbar. The toolbars stay, so you can carry on working normally and simply have more room for the picture.
Esc or another F switches back. It works from any view.
Slideshow
S starts the slideshow, from the loupe or from the grid, which then switches to the loupe by itself. Another S pauses and resumes, Esc ends it.
Each picture stays up for four seconds by default; you can change that in the settings.
At the end the slideshow starts again from the beginning and keeps running until you stop it.
What gets shown is up to you, and there are two ways to decide:
- Through the filter. Set a filter, say four stars and up, and start with S. The slideshow runs over whatever the filter leaves.
- Through a selection. Mark individual pictures in the grid and it runs over those only, regardless of what else is in the folder.
The first is quicker for a whole series, the second more precise when you're putting a handful of pictures together.
You stay in control while it runs: the arrow keys and the scroll wheel jump forward and back without ending the show. If it's playing, the timer for the current picture starts again after a manual jump.
That's also how you go through a selection at your own pace: S to start, S again straight away to pause - and now you page by hand through exactly those pictures.
Second monitor
F11 opens the current picture in a window of its own on your second screen, filling it, with no controls at all. You keep your main window with every toolbar and tool.
That's what makes it useful in front of a client: you see your working environment, they see nothing but the picture.
The two windows stay connected. Page in the main window and the second one follows - whether you're in the grid, the loupe or editing. While you edit, the second screen shows the current state of your changes without the sliders and tools. Zooming and panning work there too.
A slideshow on the second screen
The two together make the simplest presentation there is: F11 to put the picture on the second screen, then S for the slideshow. Your audience gets the series full-screen, you keep your working view - and you can pause or jump ahead at any point.
If there's no second screen, the menu entry stays visible but grayed out, so it's clear the feature exists as soon as a monitor is plugged in.
6 Search
In an archive that has grown over the years you usually know roughly where something is, but not exactly. Search saves you the clicking: Ctrl+F opens a field, you type two characters, and the results are there.
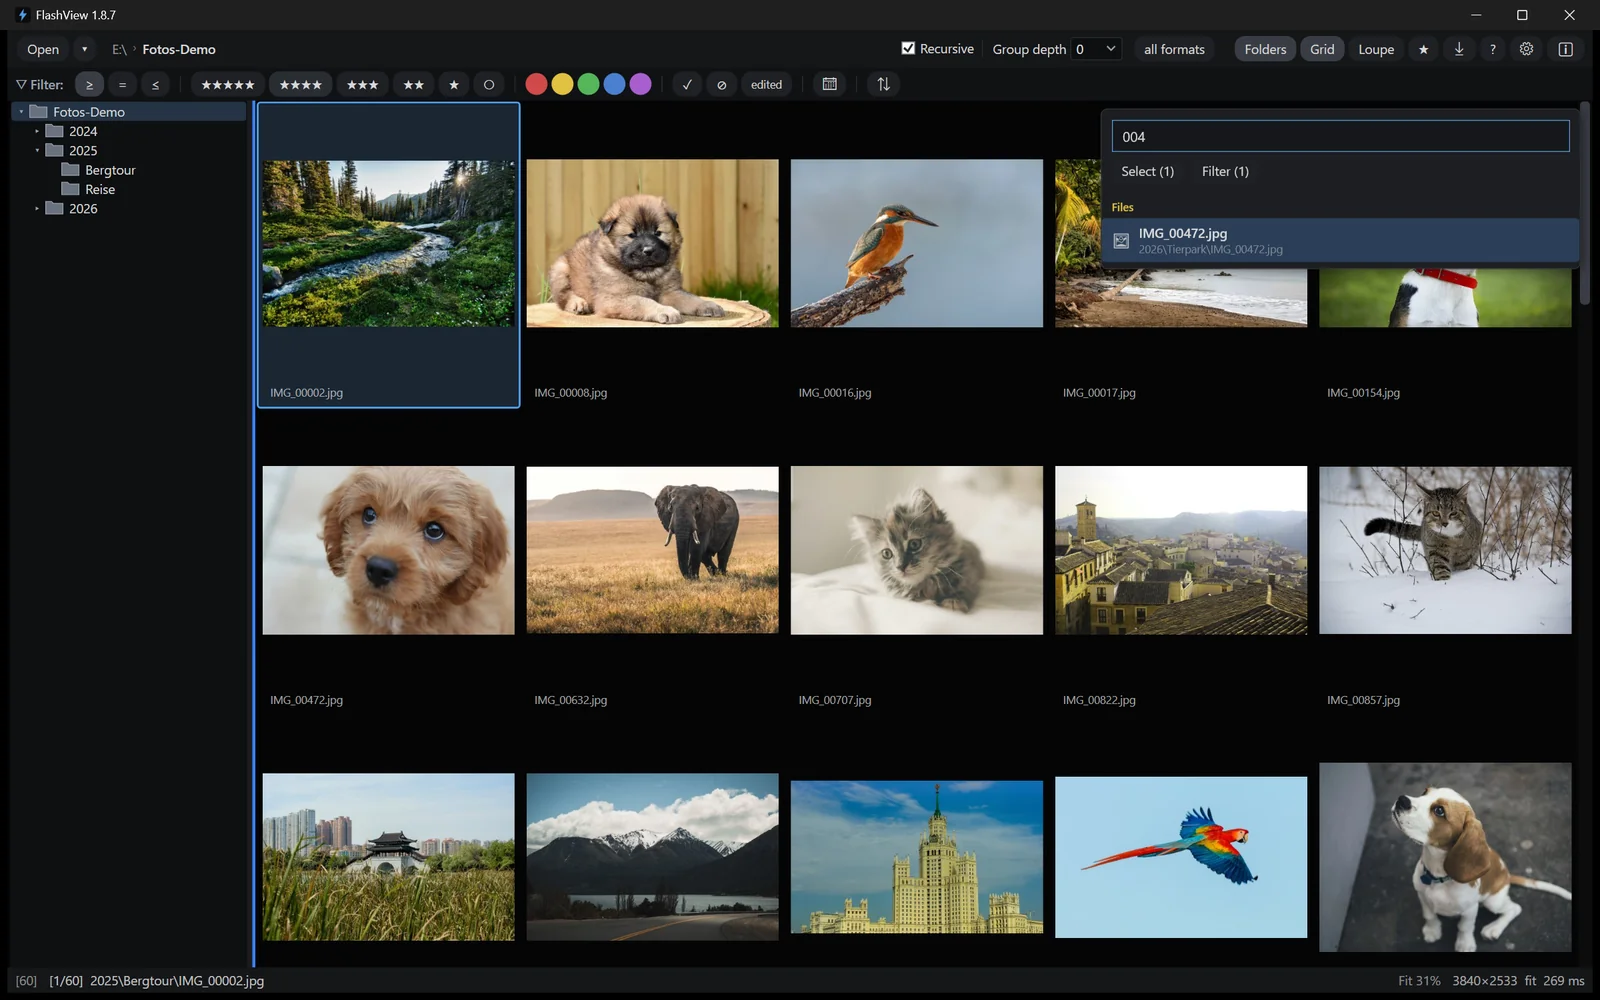
FlashView searches folder and file names, ignoring case, across your whole library - not just the folder you happen to have open. The index lives in memory and is built in the background when you open your library. There's no database to maintain.
Using it
The result list has two parts: matching folders first, matching files underneath. You get five folders and ten files to start with; if there are more, … and N more fetches the next batch.
| Key | Action |
|---|---|
| Ctrl+F or F3 | open search |
| ↑ ↓ | move through the results |
| Enter | open the highlighted result |
| Esc | close |
Both keys do the same thing. F3 is there as well because plenty of programs put search on it and fingers find it by themselves.
A folder result opens that folder. A file result jumps to the picture - if it lives somewhere else, FlashView switches to that folder and shows it. Whether you were in the grid or the loupe is preserved.
Your last search is still there
Closing the panel doesn't clear it. Open it again and your last query and its results are still in place. If you keep going back to the same shoot, you type it exactly once.
Select and filter
Two buttons appear below the field as soon as there are results: Select and Filter. Both apply to the folder you're currently in, not to the whole library - which is why the number in brackets tells you how many matches that folder holds.
- Select marks the matches in the grid. From there you can rate, copy or export them together.
- Filter hides everything else. Your search term becomes a name filter, which you will find in the filter bar and can drop there again.
A zero in the brackets means your current folder has no match even though the search found some - they're elsewhere in your library. The buttons stay visible but do nothing.
When a match doesn't show up
If the picture you searched for is hidden by an active filter, FlashView says so in the status bar rather than appearing to do nothing. Clear the filter and there it is.
7 Rating and marking
Culling is assembly-line work: look, decide, move on. This part of FlashView is built for exactly that - one key per decision, no menus, no waiting.
Three axes that stay out of each other's way
FlashView has three ways to rate, and they're independent. A picture can carry four stars, a green color label and a pick all at the same time. Setting one leaves the others alone.
| Axis | Keys | Meaning |
|---|---|---|
| Stars | 0-5 | the classic XMP rating. 0 clears it. |
| Color labels | 6 red · 7 yellow · 8 green · 9 blue · V purple | yours to define, usually status or ownership. |
| Pick / reject | P pick · X reject · U clear | the quick yes/no. |
Color labels and pick/reject are toggles: the same key again takes the mark off. Press 6 twice and red goes on, then off. Stars work differently - each key sets its value, and 0 clears.

Stars are the common denominator across every program there is. Whatever you give here, any catalog will see. Color labels are freer: some people track editing status with them, others the client or the subject.
Pick and reject sit next to them and mean something else - not "how good" but "in" or "out". On a first pass through a series that's usually the only decision that counts.
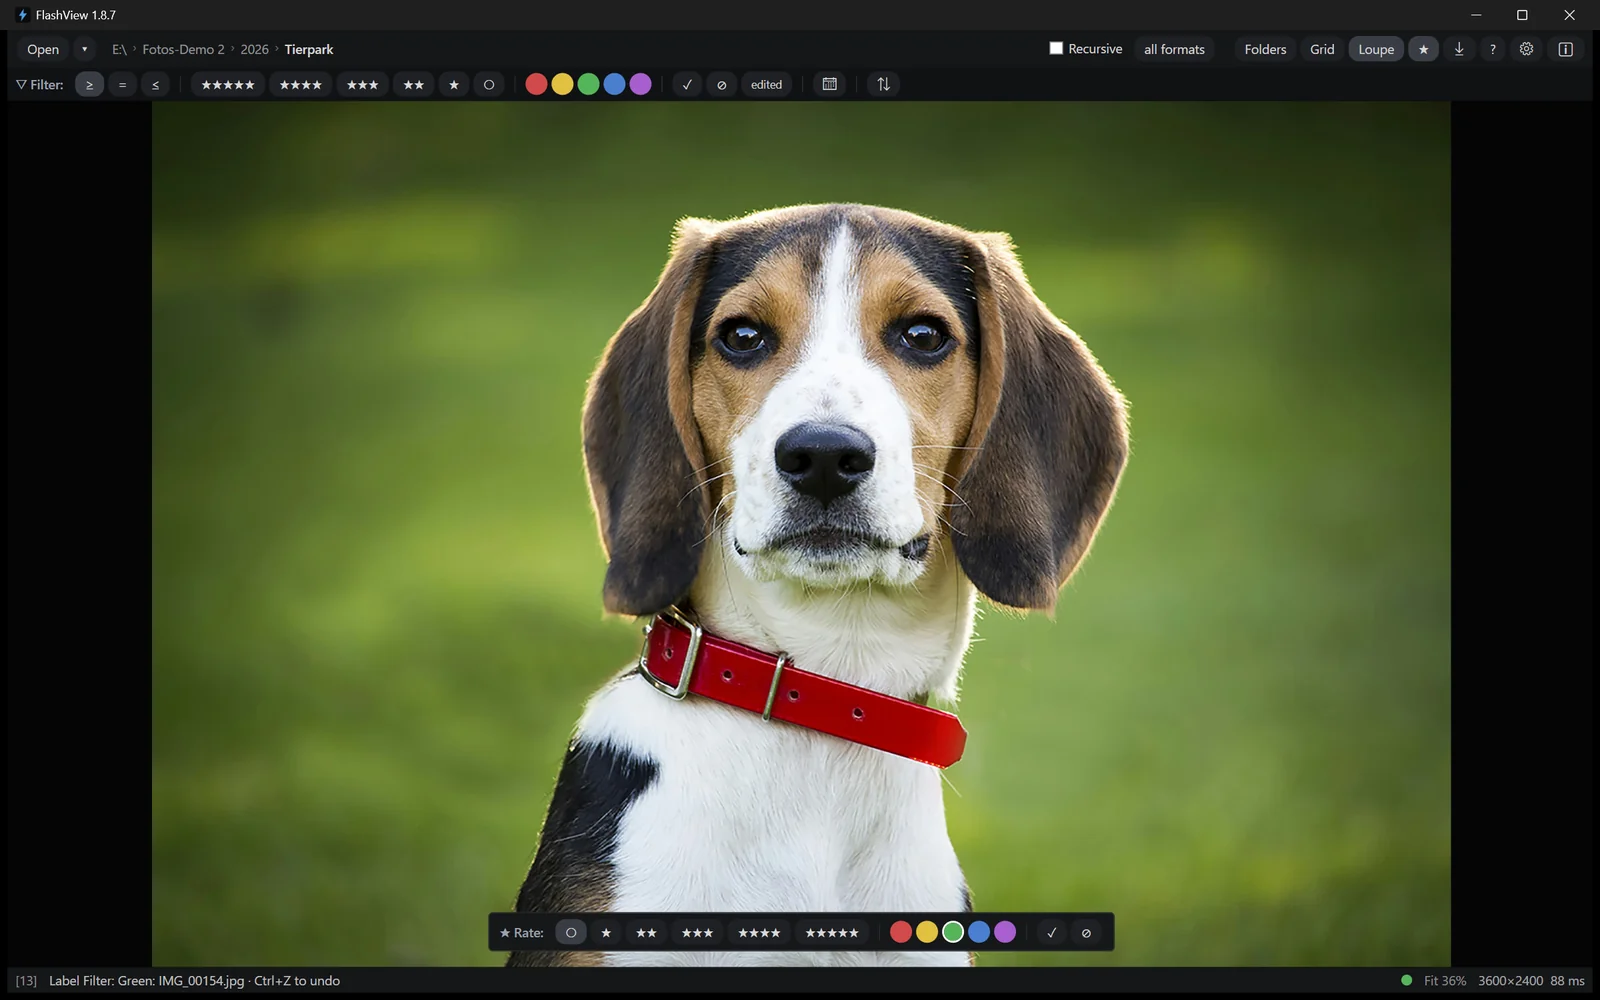
How the current image is marked shows at the bottom right of the status bar, next to the stars and the color label: a green check in a circle for pick, a red ✕ for reject. Either one appears only when it is set. In the grid the thumbnail carries the same information - in the loupe and in compare there is no thumbnail, so the status bar is where you read it.
In the grid, a color label tints the cell
Set a color label and the grid shows more than the dot in the info line: the area around the picture takes on the same color, muted enough to leave the photo in charge.
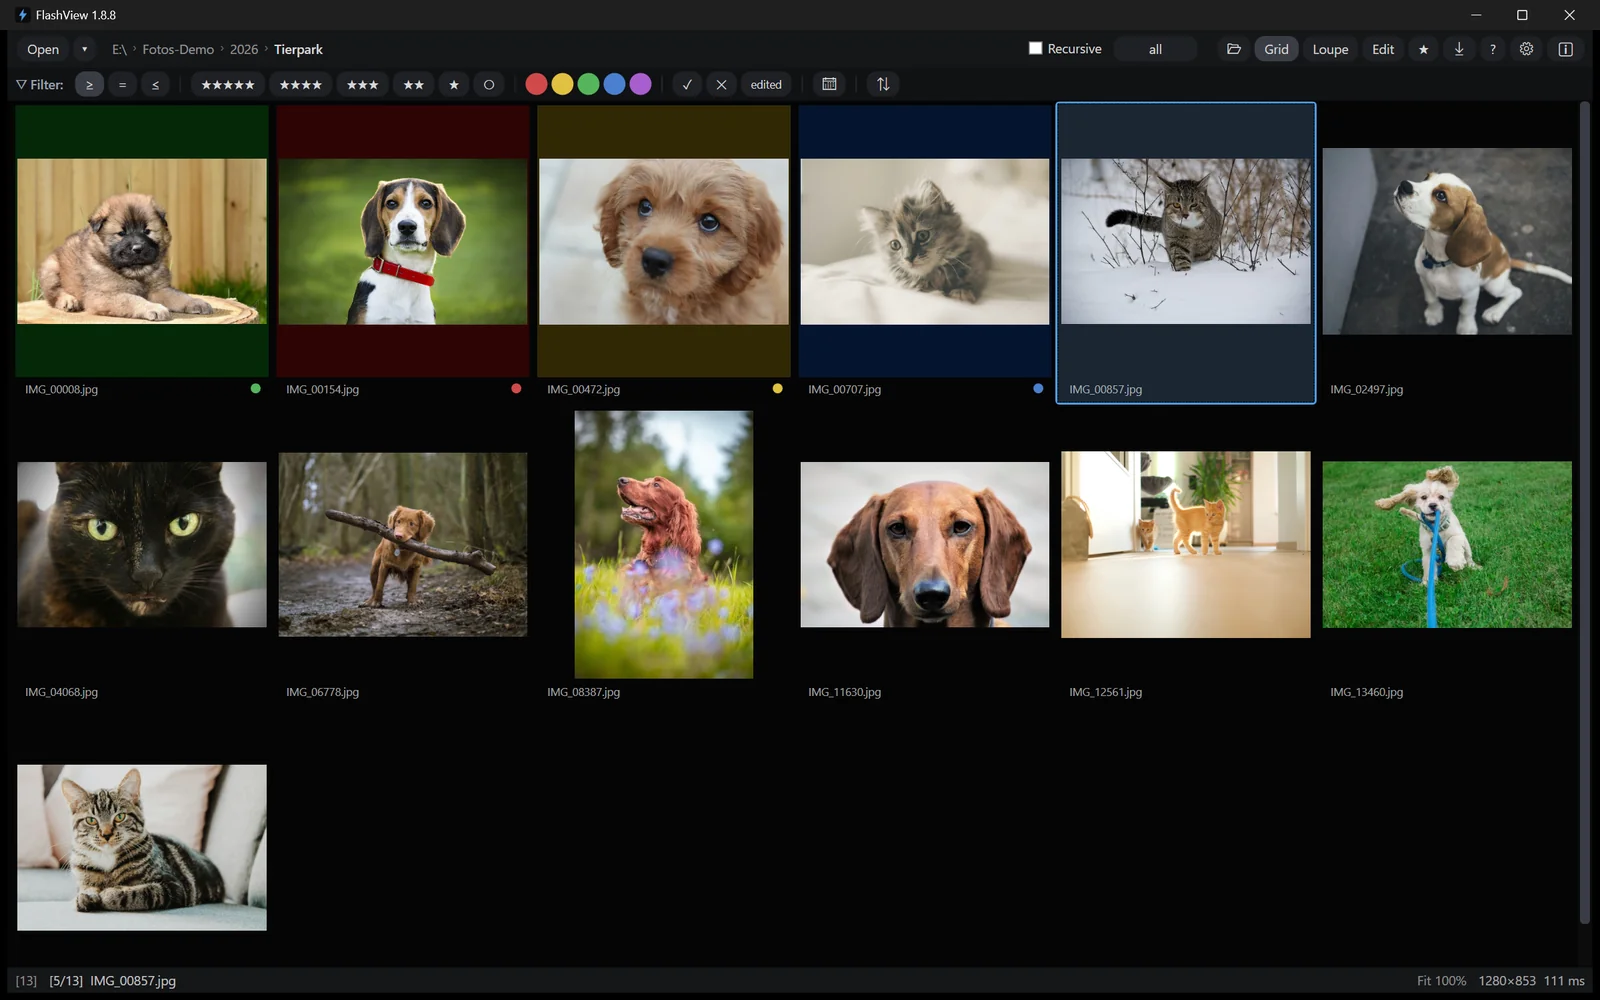
Having both is deliberate. The tint is what you catch while scrolling past a whole page; the dot tells you the exact color close up. The info line itself stays black and readable.
How much color you see depends on the picture. A photo only ever fills its cell in one direction, and the color sits in the band beside it - above and below for a landscape shot, left and right for a portrait one. Cell and image size don't change; the picture doesn't lose a pixel.
You don't need the keyboard
If you'd rather use the mouse, bring up the rating bar. There are two ways:
- Keep it visible. R shows and hides the bar, as does the ★ button in the toolbar, which also indicates whether it's currently on.
- Bring it up briefly. In the loupe, just move the pointer to the bottom edge of the image. The bar appears for two seconds and goes away again.
A click sets the value outright rather than toggling it. Three stars stay three stars even if you click the same star twice.
The bar belongs to the view
R only ever applies to the view you're in: showing in the grid and hidden in the loupe is a perfectly ordinary state, not a glitch. FlashView remembers the two separately, because you work differently on a contact sheet than on a single frame.
The folder tree behaves the same way - Shift+T switches it per view, on in the grid and off in the loupe out of the box. The EXIF panel and the histogram never raise the question: they only exist in the loupe.
Auto-advance: one key, one picture
Working through a series, you want the next picture the moment you've decided. Turn on auto-advance, either with Caps Lock - the same convention Lightroom uses - or through the loupe's context menu, where Auto-advance gets a check mark. The status bar then shows "Auto-advance" in pale blue while it's running.
From then on every decision moves you forward: stars, color, pick, reject, and clearing them too. Even a 0 on an unrated picture moves on, because that was a decision as well. The mode only applies in the loupe and only to single pictures, not to a multiple selection.
It doesn't survive a restart
Auto-advance is deliberately tied to the session and always off at startup. Otherwise one stray press of Caps Lock would rearrange your navigation for good.
Whole series at once
Mark several pictures in the grid - Shift for a range, Ctrl for individual ones, Ctrl+A for everything - and press the rating key. FlashView writes the change into every marked file and stays responsive while it does.
There are two safeguards:
- Above 100 images FlashView asks first, naming the action and the count. That catches the accidental Ctrl+A.
- Above 500 images you get a progress bar as well.
Trigger another batch while one is still running and FlashView queues it. The status bar then shows how many operations are waiting. The order is preserved, and two batches never write to the same file at once.
Wrong key? Take it back
Ctrl+Z undoes the last rating, including a bulk operation, and does so in one go rather than picture by picture. FlashView keeps ten steps.
With auto-advance on, undoing jumps the loupe back to the picture whose rating you just took away. So you're looking at the one you're about to decide on again.
What lands on disk
Ratings don't go into a database, they go next to the pictures as standard XMP. Exactly where depends on the format:
- JPEG: the XMP block is embedded in the image file itself.
- RAW: a sidecar file
name.xmpappears alongside. The raw file itself is never touched.
FlashView writes the fields other programs already read: xmp:Rating for stars,
xmp:Label for the color label, xmpDM:pick and xmpDM:good for pick and reject.
Those last two deliberately follow Lightroom's convention so your picks arrive there
without a detour. Lightroom, Bridge and Capture One read all of it as it is.
Other people's entries stay untouched
If an existing XMP file is locked - because Lightroom is writing to it at that moment - or damaged, FlashView refuses to write and reports it in the status bar. Better a rating that doesn't arrive than overwritten develop settings. The next key press reads afresh and carries on normally.
Color labels are a special case
A German-localized Lightroom expects German color names, Bridge expects English ones. If your color labels show up elsewhere as a plain white flag, change the format in the settings under Color labels compatible with. Reading, FlashView understands both.
8 Comparing images
A series rarely gives you two equally good frames - it gives you twenty similar ones: the dog running at you, the sports sequence, the turn in a dance. That's what compare is for: two pictures side by side at the same zoom, and a mechanic that lets you work through the whole series until the best one is left.
C turns it on and off again, from the grid as well as the loupe. Fewer than two images won't work, and FlashView says so.
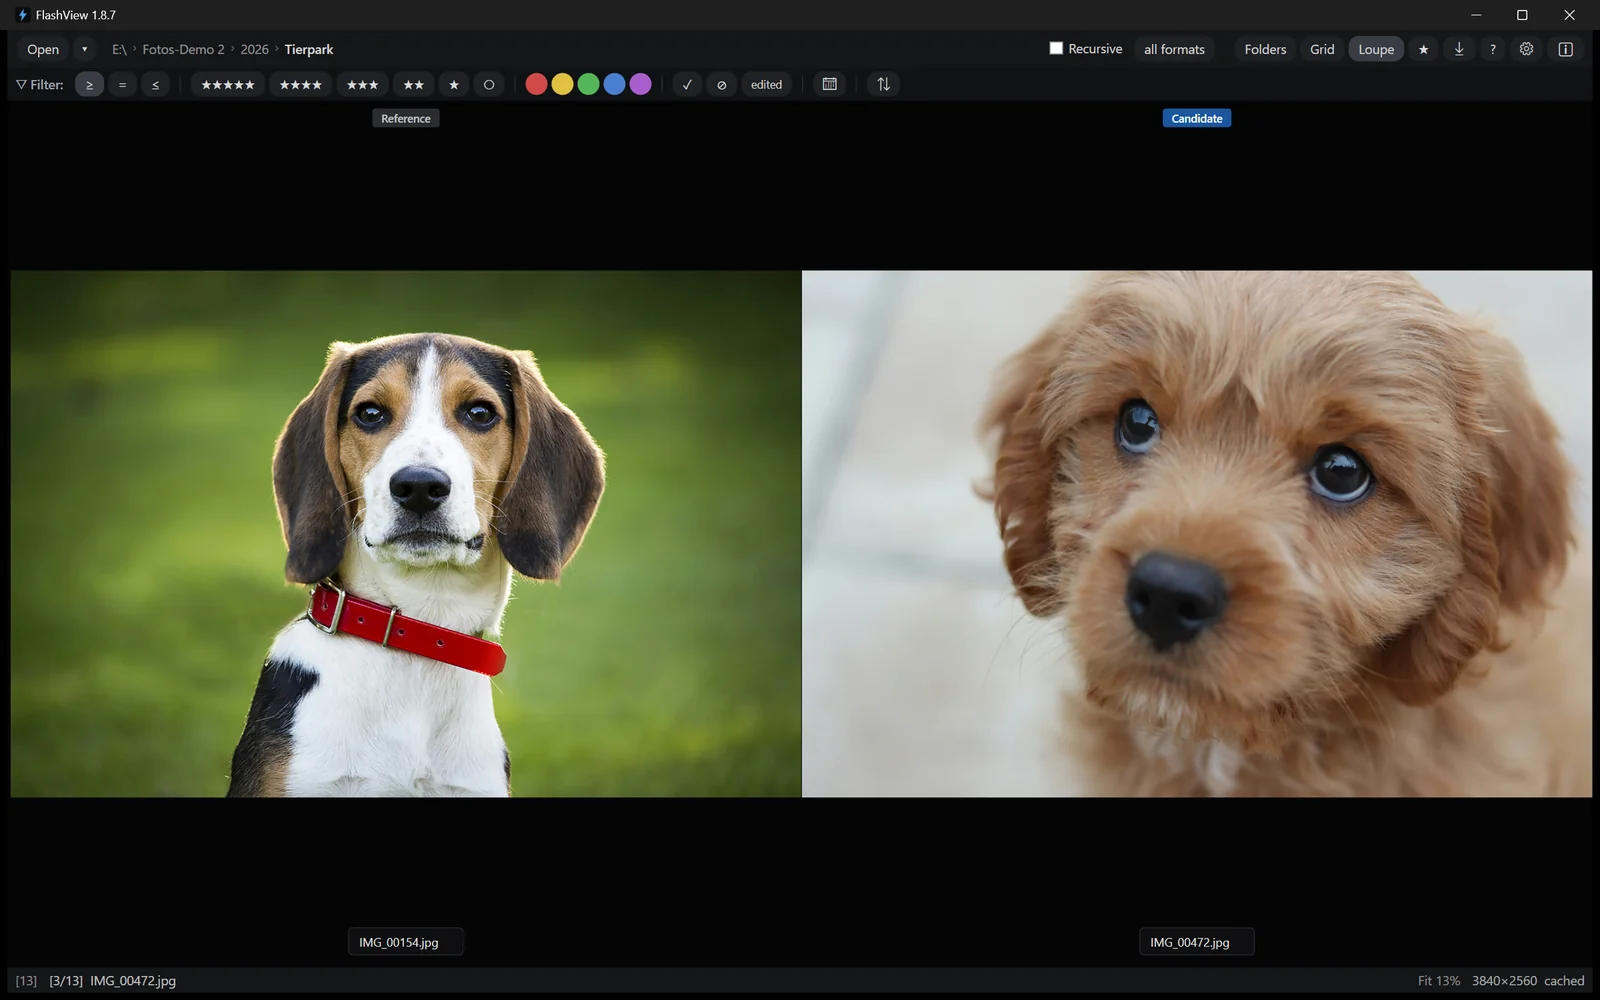
The file name sits under each picture, the role above it. The active side is highlighted in blue - that's the one your key presses go to.
Candidate and reference
The two sides are not equals, and that's the heart of it:
- The reference is your current benchmark. It stays put.
- The candidate is the challenger. It travels through the series.
When you switch compare on, the picture you were looking at becomes the reference and the next one becomes the candidate. The keyboard always acts on the candidate: ← and → move it through the folder, skipping the reference - the same picture never appears twice.
The two keys that matter
| Key | Action |
|---|---|
| ↑ | the candidate becomes the new reference, the pass carries on |
| ↓ | candidate and reference swap places |
That's how you work through a series without thinking about it: if the candidate beats the reference, press ↑ - it becomes the new benchmark and the next one steps up. If it doesn't, press → and move on. What's left as the reference at the end is the best frame of the series.
The difference between the two keys is where you carry on afterwards:
- After ↑ the pass continues from where you were. The new benchmark is set, the order is untouched.
- After ↓ you carry on with the other picture. The roles have swapped, the position in the series stays.
Leaving with the winner
When you exit, the loupe always shows the candidate, never the reference. So if your winner is sitting as the reference, bring it over to the candidate side first, with ↓ or Tab. Then leave with Esc or C and you carry on with the right picture.
Switching sides
Sometimes you want to rate the picture that's currently the reference. Then you need to move the active side:
- Shift+C switches between the two.
- Tab does the same. If the folder tree is showing, it joins the rotation.
- With the mouse: one click on the passive side makes it active. A second click zooms, just as it would in the normal loupe.
The pictures stay where they are; only the roles change. Which side the candidate starts on is set under Compare in the settings - the default is the right.
Rating while you compare
Shortcuts always act on the active side. When comparing, though, you often want to rate both pictures without swapping roles all the time. Press R for the rating bar and it appears under both images.
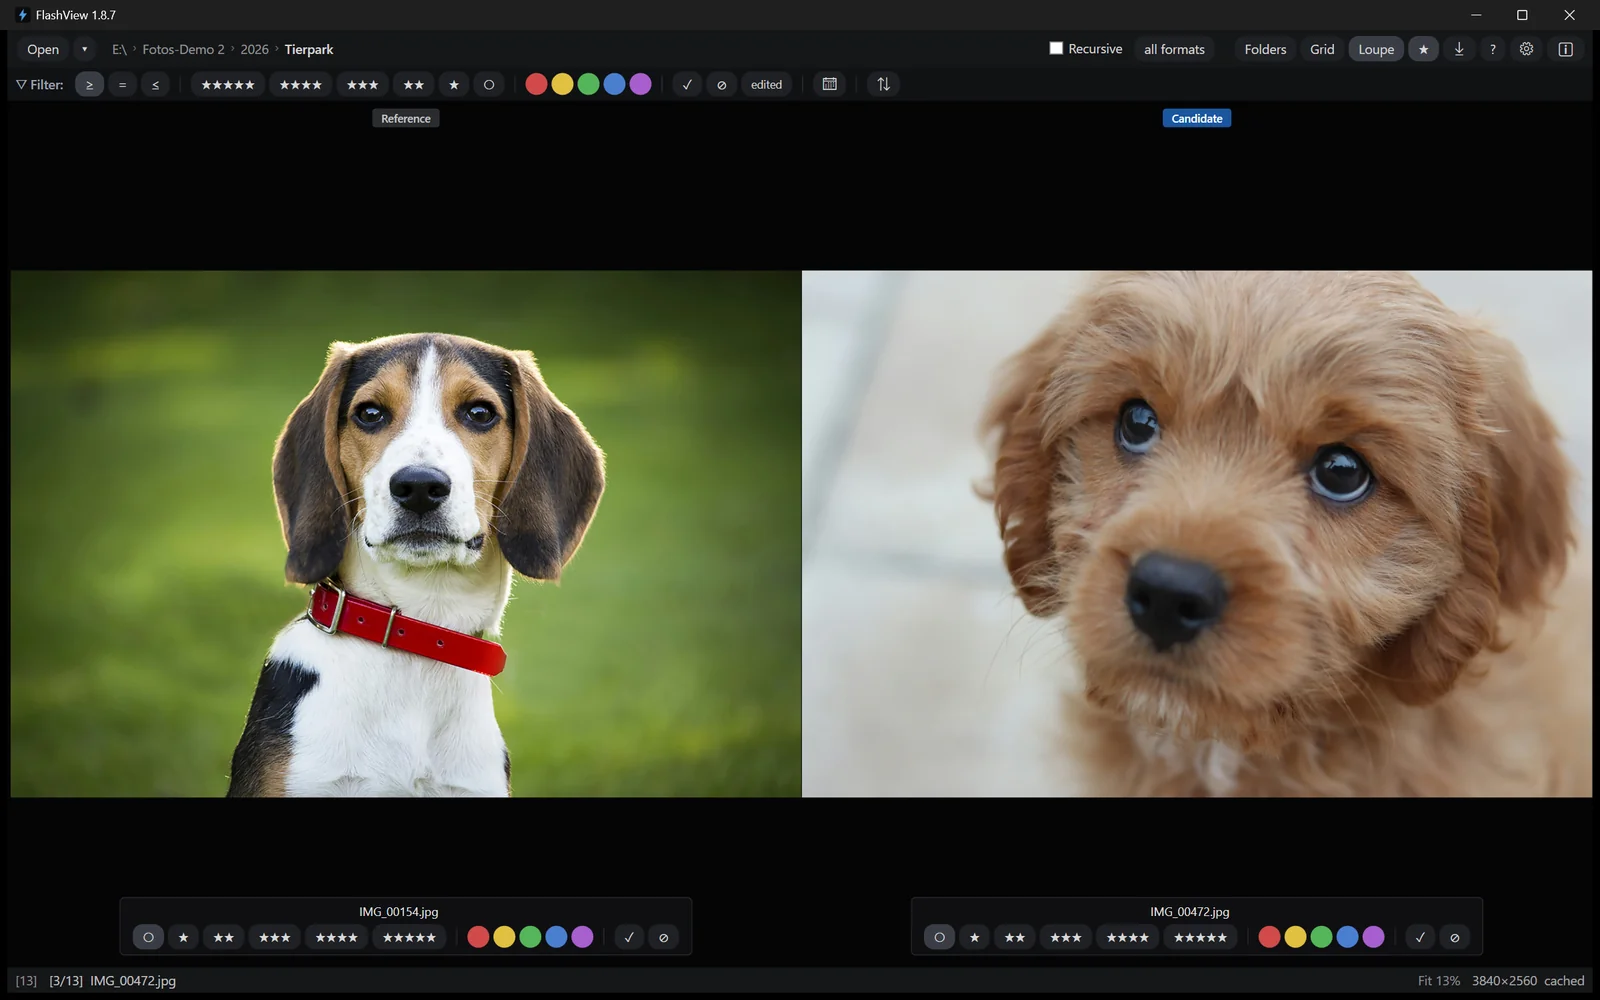
So you can score each of the two without leaving compare. The keyboard stays with the active side - the two work side by side.
Zoom on both sides
The two sides are coupled by default: zoom into one and the other follows to the same spot. That's exactly what you need when comparing sharpness.
The coupling works across different resolutions too, say when you hold a raw file against the camera's own JPEG - FlashView converts the position rather than counting pixels. You can switch it off in the loupe's context menu under Sync zoom. The entry is only there while compare is running - outside it there's nothing to couple. Right below sits Lock zoom, which holds the framing as you page and is available either way.
9 Filtering and sorting
After rating comes narrowing down. The filter bar above the grid shows only the pictures you want to see - and the most important sentence about it is already in the program itself: it filters what's displayed, it doesn't rate anything. A filter never changes your pictures.
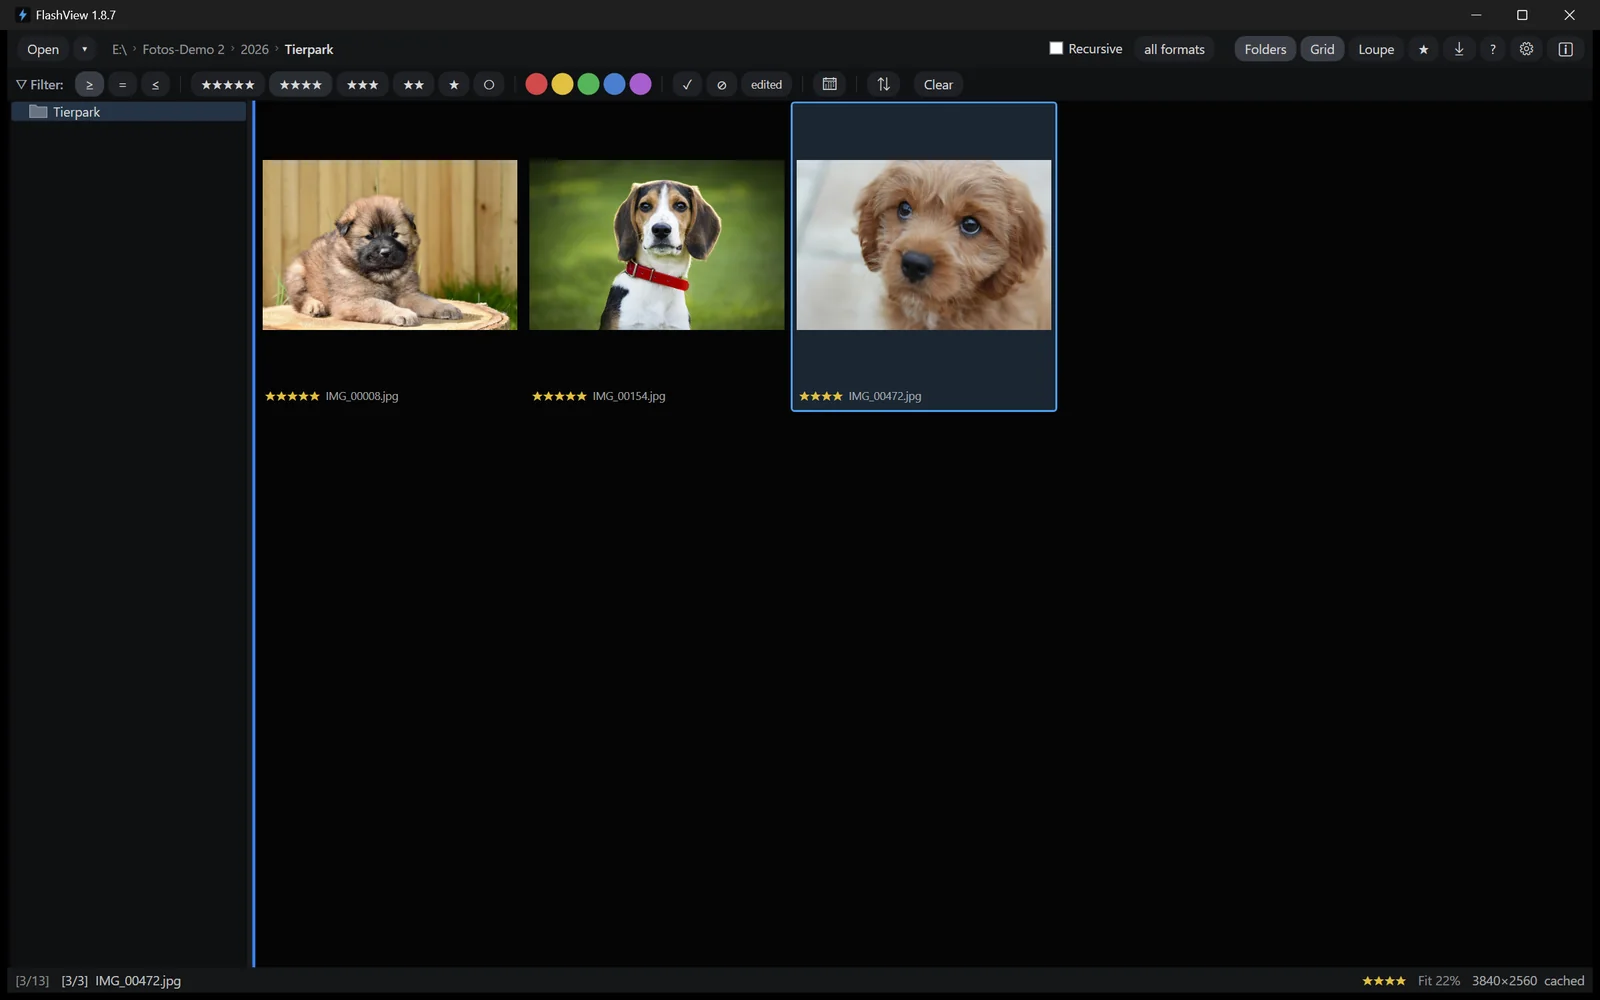
Filtering always applies to the folder you're looking at. All the criteria combine: four stars and a green label and shot last month.
By stars
The star filter has three modes, which you switch on the left of the bar:
| Mode | Meaning |
|---|---|
| ≥ | at least this many stars |
| = | exactly this many |
| ≤ | at most this many |
Then click the number of stars you want. The empty circle on the right stands for unrated - useful for spotting what you haven't looked at yet.
"Four stars and up" is the classic for the selection that goes to the client. "One star at most" helps with the clear-out: anything still unrated after a pass can usually go.
By color, pick and reject
The five color dots filter by color label, and several can be active at once.
Next to them sit the two switches for pick and reject, and they behave differently:
- ✓ filters for picks. Two states: off, or picks only.
- ✕ filters for rejects. Three states: off, rejects only, hide rejects.
That third state on the reject filter is no accident. "Hide rejects" is the quiet helper on a second pass: the discards disappear from view without you having deleted anything. There's no reason, on the other hand, to want everything except the picks - which is why that switch has only two positions.
By file type
The all formats button doesn't sit in the filter bar but at the top right of the toolbar, next to Recursive. That's the right place for it, because it doesn't choose among your pictures - it decides what you're working with at all.
It cycles through three states: all formats, no RAW, RAW only. The label always tells you what's in force; Shift+J moves it on.
You need this in folders where every shot exists as a raw file and a JPEG. Without it, you see every subject twice.
Untangling RAW plus JPEG
If you shoot RAW+JPEG, set it to no RAW while you cull - then each subject appears once and the previews are faster. For the close inspection switch to RAW only and you see exactly the files you'll develop later.
What FlashView shows
So that it's clear what the three states cover, here are the formats in full. Everything in these lists appears in the grid, counts towards the number in the status bar and opens in the loupe.
Finished images - always visible, whichever way the button is set:
| Format | Extensions |
|---|---|
| JPEG | .jpg .jpeg .jpe .jfif |
| PNG | .png |
| HEIC / HEIF | .heic .heif .hif |
| Photoshop | .psd |
Raw files - these are what no RAW hides, and the only ones RAW only shows:
| Manufacturer | Extensions |
|---|---|
| Canon | .cr3 .cr2 |
| Nikon | .nef |
| Sony | .arw |
| Fujifilm | .raf |
| Olympus / OM System | .orf |
| Panasonic | .rw2 |
| Pentax | .pef |
| Samsung | .srw |
| Hasselblad | .3fr .fff |
| Adobe | .dng |
| TIFF | .tif .tiff |
TIFF is in the second table on purpose. In a raw workflow a TIFF isn't a deliverable but the working master on the way to one - raw in, plug-in, TIFF out, JPEG to the client. While you're culling, you want it out of the way along with the raw files. PSD deliberately doesn't count as raw, because it comes out of no camera; it stays visible throughout.
HEIC needs an extension from Windows
For .heic and .heif - what iPhones shoot - Windows needs the HEIF Image
Extensions and the HEVC Video Extensions from the Microsoft Store. Without
them the tile stays empty and FlashView says so on the spot. Everything else in
the two tables FlashView handles itself; raw files and PSD need nothing
installed.
FlashView also registers all of these for Open with in Explorer if you turn the file association on - see Settings.
By date
The calendar icon opens the date filter, as does Shift+D. It offers quick choices for Today, Last 7 days, Last 30 days and This year, plus two fields for a range of your own.
You don't have to fill both: From alone means "from this day on", To alone means "up to this day". Both days are included.
It filters on the file date - the timestamp the file carries on disk - not on the capture date from the camera. For pictures straight off a card the two are the same; after an import or a copy they aren't. If you want to go by when the shot was taken, the way there is sorting by Capture date. Both values sit one below the other in the EXIF panel, so you can see at once whether they differ for your pictures at all.
By camera, lens and exposure
Shift+E opens the EXIF filter. It filters on what the camera recorded: camera, lens, photographer, ISO, aperture, shutter and focal length. Only the values that actually occur in this folder are offered - so you're choosing from your own pictures, not from a list of every lens ever built. Reset EXIF clears that selection without touching the other filters.
Use it to pull the frames from one particular body out of a mixed folder, to see how a new lens is doing, or to check what was still usable at high ISO.
Switch it on first
The EXIF filter only appears if Enable EXIF sort & filter is on in the settings - it's off out of the box. Reading the values costs no speed; it's off only because it's aimed at photographers who care. There's more in Settings.
Edited versions and originals
Save an edit and the result sits next to the original as its own file, so both appear in the grid together. The edited button separates them: one click shows only the edited versions, the next - now labeled originals - shows only your untouched material, and a third clears the filter. The tooltip always tells you where the next click leads.
Sorting
Shift+O opens sorting, as does the icon on the right of the filter bar.
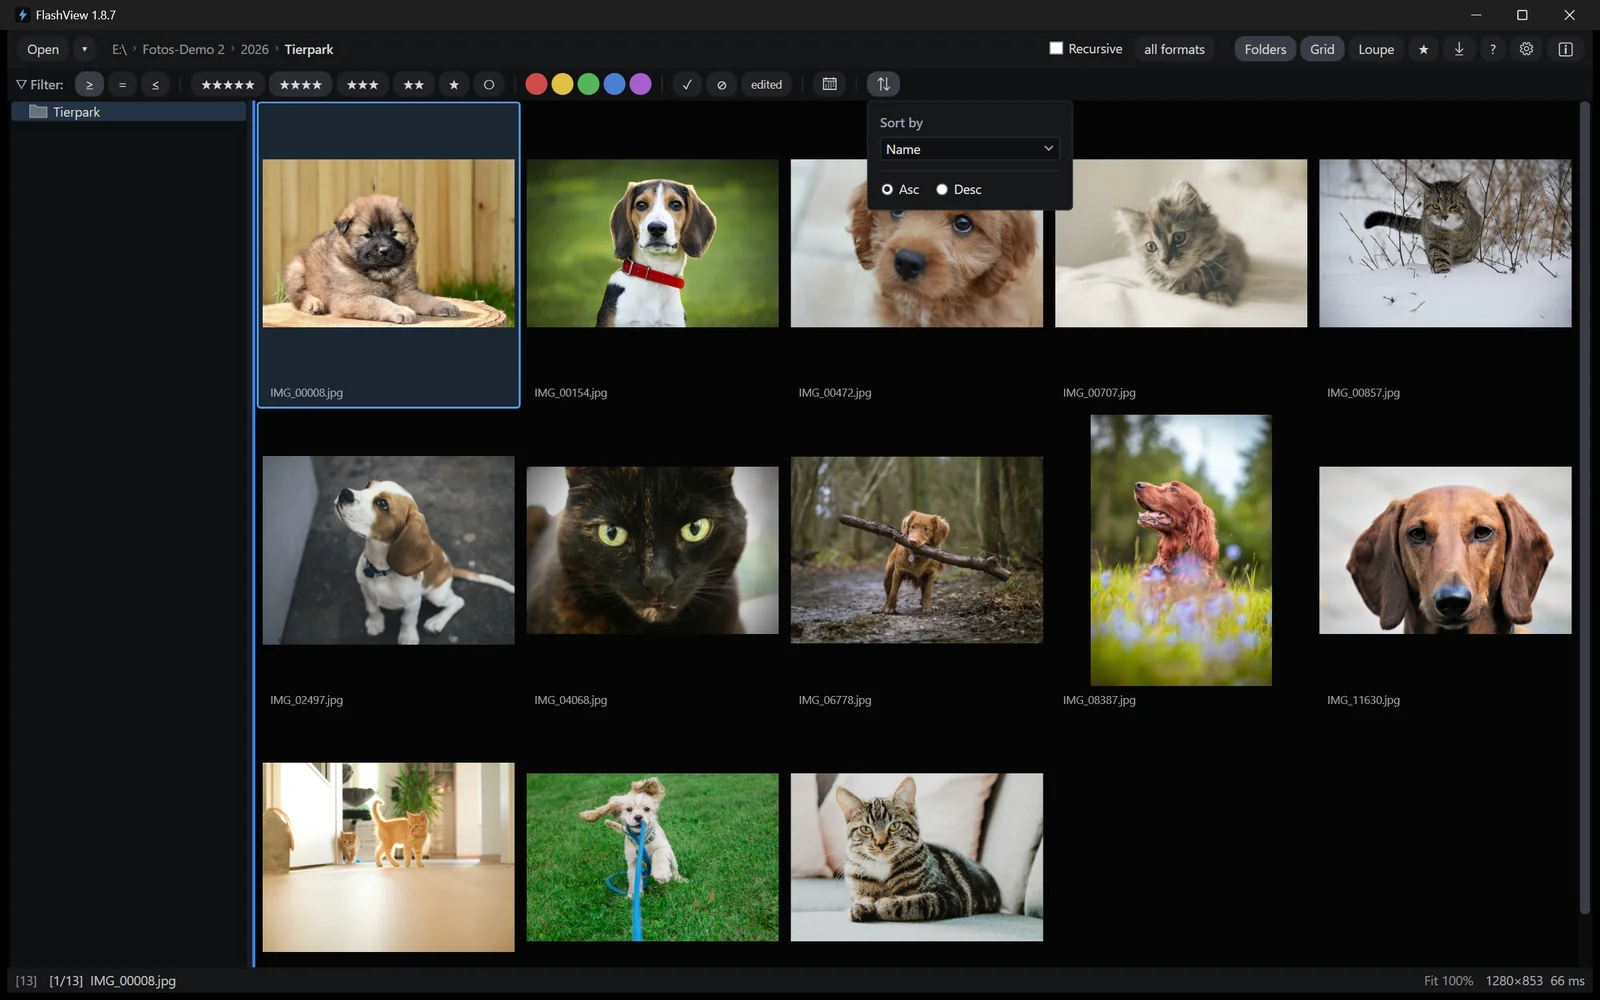
You can sort on five criteria, each ascending or descending: name, date, rating, color label and file size.
With the overlay open you can work without the mouse: ↑ and ↓ change the criterion, ← and → the direction.
Sorting is remembered per folder. A folder you left sorted by rating is sorted that way again next time you open it.
An active filter is always visible
FlashView marks any filter you've set clearly in the bar, and a Clear button appears next to it that drops everything at once. The status bar helps too: it gives you the number of matches and the total in the folder. Nothing is more annoying than a folder that seems to be missing pictures because a forgotten filter is hiding them.
10 Files, clipboard and export
After the culling comes the rest of it: the good pictures go to the client, to the cloud or into the archive, and the discards go away. All of it happens in FlashView, without a trip to Explorer.
To the clipboard
Two shortcuts that do different things:
| Key | What ends up on the clipboard |
|---|---|
| Ctrl+C | the image itself |
| Ctrl+Shift+C | the file path as text |
The first is the quick way into another program: WhatsApp Web, Signal, an email, a document. You copy the picture and paste it there, without exporting anything first.
The second is for when a program asks you for a file - an upload, a ticket system, the command line. Instead of typing the path out, you paste it.
In the loupe's context menu the two are called Copy image and Copy path.
The image, not the file
Ctrl+C puts the image data on the clipboard, not the file. So you can't paste it into Explorer as a file. Anywhere a picture is expected, though, it's welcome. FlashView says "clipboard" in the status bar explicitly, so the two cases don't get mixed up.
Selecting
Ctrl+A selects every image that's currently visible. That's more than a detail: if you've filtered to four stars, Ctrl+A marks exactly those, not the whole folder. Ctrl+D clears the selection again. In the grid's context menu the two are Select all and Clear selection.
That lets you chain filter and selection: narrow down first, then select everything, then export, rate or delete.
Deleting
Delete moves the current image to the Windows recycle bin, or all the marked ones if you have several selected in the grid. FlashView asks first.
Nothing is deleted for good. If a raw file has a sidecar with your ratings next to it, that goes along too, so nothing is left orphaned.
The entry is in the grid's context menu as well, at the bottom and set apart by a separator.
Clearing out the rejects in one go
Chaining a filter and a selection is the fastest way to tidy up a shoot: set the reject filter to rejects only, press Ctrl+A, then Delete. Confirm, and the whole lot is in the recycle bin - and because it's the recycle bin, you can still change your mind.
Copying to a folder
Sometimes you don't want new JPEGs, you want the files themselves somewhere else: the picks of a shoot in a selects folder, a few frames on an external drive, a series in the folder your client syncs.
That's what Copy to folder… in the grid's context menu is for. It copies your selection - or, if you haven't selected anything, the current picture. In other words exactly what Delete would hit, and deliberately not the whole filtered set.
Each picture travels with everything that belongs to it: the XMP file holding your ratings, the recipe of an edit and the edited version. What lands in the target folder is a complete set, not half of one.
As with the import, you can tick Verify copy - FlashView then reads every written file back and compares it. The run works in the background; the status bar shows the progress and, at the end, how many files were copied, skipped or failed.
Your source is unchanged and your folder stays open - you copy the picks out of the way and carry on culling.
Exporting
Ctrl+E opens the export, as does Export in the grid's context menu. It exports your selection - or, if you haven't selected anything, the whole filtered set.
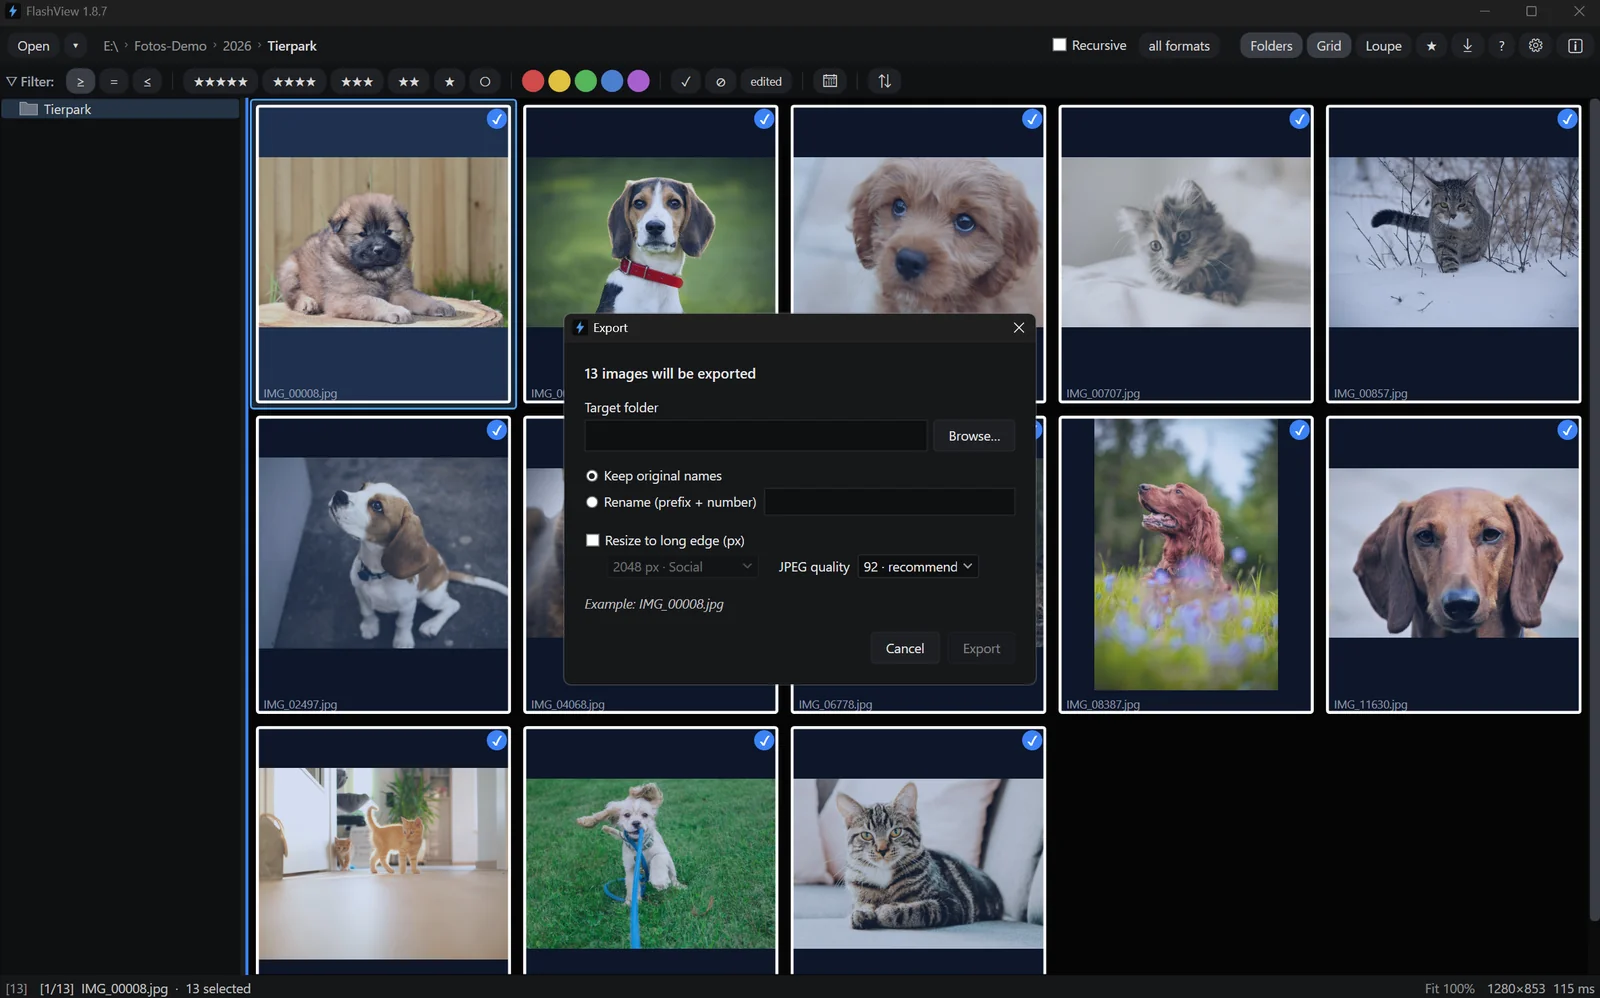
Destination is chosen through Browse. FlashView remembers where you sent things last time and offers those again.
Naming either keeps the original names or numbers the files with a prefix of your
choosing - Wedding001.jpg, Wedding002.jpg and so on. The sample line in the
dialog shows what the first file will be called.
Resize is optional. With the box ticked you choose the long edge: 1024 px for the web, 2048 px for social media, and larger steps up to 4K. Nothing is ever scaled up - a smaller picture stays as it is.
JPEG quality defaults to 92, which is plenty for almost anything. Above that there's 95 and 100, below it 85 and 75.
Export creates new files
Every export writes a fresh JPEG; your originals are untouched. The new files carry no metadata: no camera data, no ratings. That's deliberate, because exports usually leave the building. If the recipient needs your ratings, hand over the originals with their XMP data instead.
An existing file is never overwritten; FlashView appends a number. The export runs in the background, you can carry on working, and the status bar shows the progress along with a way to cancel.
11 Getting pictures off the card
The first step after a shoot: card into the reader, pictures onto the disk. FlashView brings that with it, so you don't have to start another program just to end up back here for the culling.
You copy the entire contents of the card into one folder - complete, verified and in a single pass.
Ctrl+I opens the import, as does the toolbar button and Import from card… in the grid's context menu.
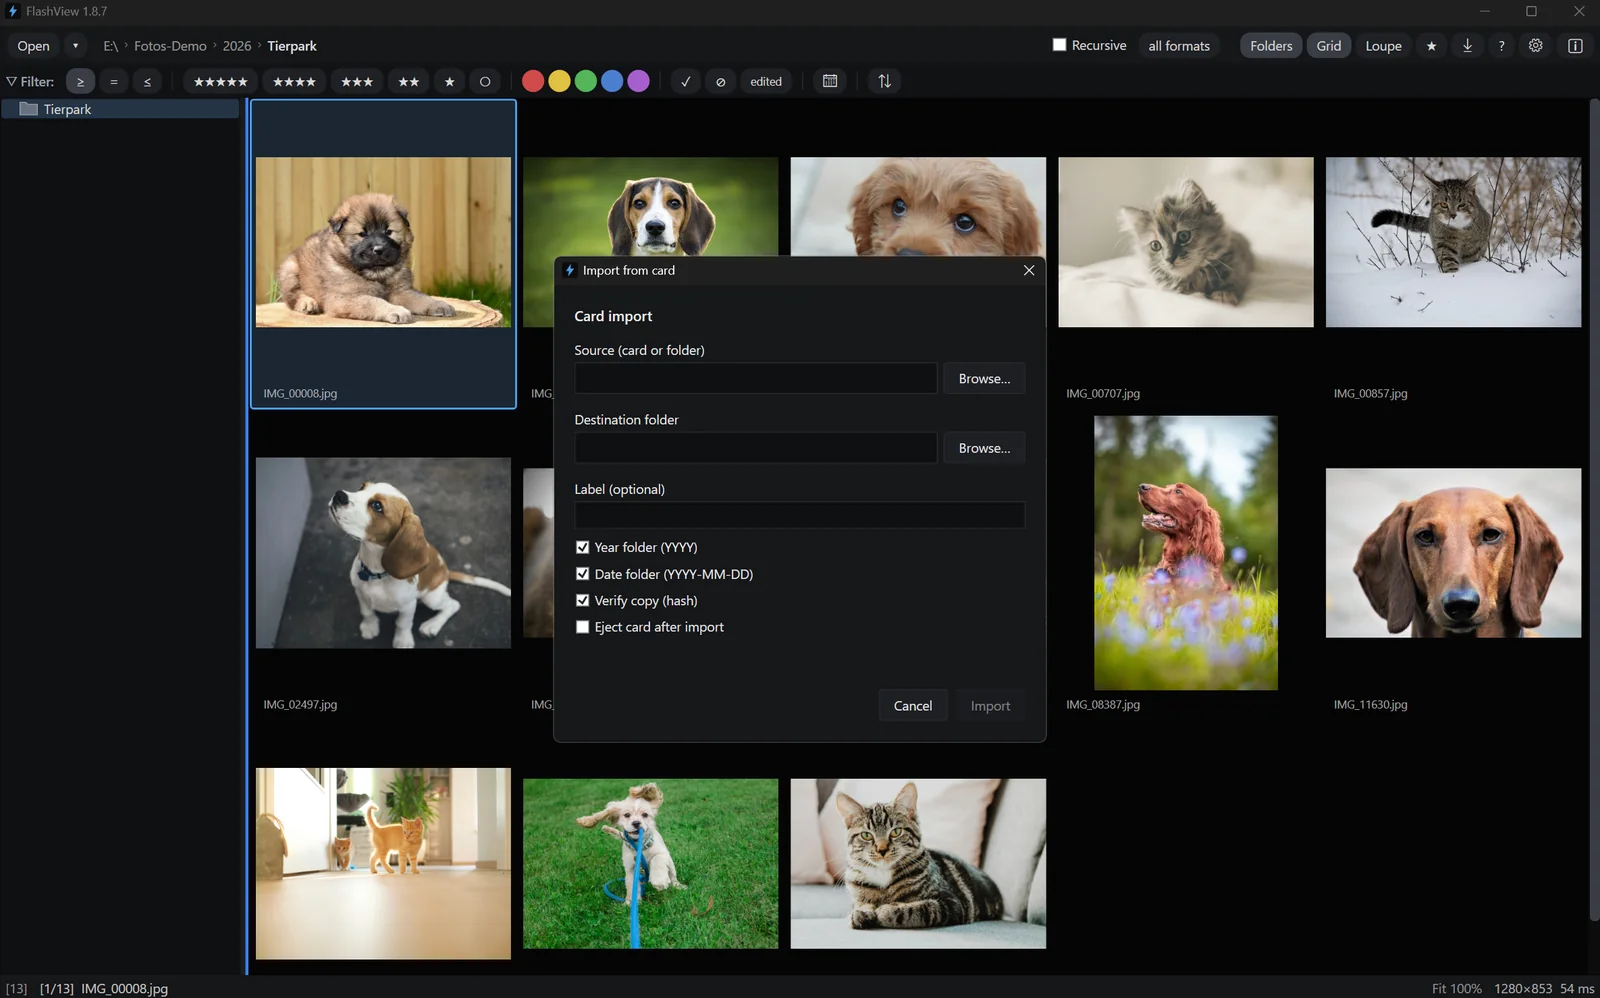
Choose a source and a destination folder; the folder form sits on a sensible default - that's enough for an import. Beyond that, the dialog offers switches to split by shooting day, rename files, verify the copy and eject the card afterwards. None of them is required: a quick import needs only source and destination, everything else is optional and can stay off.
Source and destination
For the source you pick the card. FlashView suggests removable drives and also
recognizes built-in card readers when there's a DCIM folder on them.
The destination is your archive. FlashView remembers the destinations you used last.
Once you've chosen the source it counts how many files are on the card and what dates they carry. The preview line at the bottom then shows the full path that will be created, plus the number of files and - if you split by day - of days, and an example file name. It updates on every change, before anything is copied. The preview line is the real explainer: what it shows is what you get.
What the target folder is called
You pick the folder form from a single field. Instead of abstract switches it shows you the four possible forms directly as finished example paths - you pick the one you want to see. Your label goes with it:
| Folder form | Result |
|---|---|
| Year + date | 2026/2026-05-16_Zoo |
| Date only | 2026-05-16_Zoo |
| Year only | 2026/Zoo |
| No date | Zoo |
Where the form carries no date, the dropdown entry is simply your label - and while the label is empty, it shows a long dash instead. The label then becomes mandatory, otherwise there'd be no folder name at all: the dialog says so, and the import button stays disabled until you've typed something.
The date comes from the oldest frame on the card, so from the start of the shoot.
Placing the label freely
In the simple case you just type a text, and the date goes in front
(2026-05-16_Zoo). If you want it the other way round or entirely different, the
{ } button next to the field switches to placeholders - so the label becomes
e.g. Wedding_{yyyy-MM-dd} and from it the folder Wedding_2026-08-17. Only year,
month and day are allowed in a folder name; a time would make one folder per
second.
One import, one folder - unless you split by day
By default everything on the card lands in a single folder, dated to the earliest frame on it. That keeps shots from several days together as well - a card is one job. If you want to keep the days apart, switch on One folder per shooting day (see below).
More order: splitting by day and renaming
For everyday use the above is enough. If you regularly import large or multi-day shoots, you'll find three more switches - all off by default, each toggled on its own. What they do you see straight away in the preview line.
One folder per shooting day
Instead of one folder, each shooting day gets its own:
2026/2026-08-17_Wedding, 2026/2026-08-18_Wedding, and so on. The label repeats per
day so each folder stays self-explanatory on its own - even when it later moves into
the archive by itself. Shots across New Year's Eve land correctly in two year folders.
The switch is greyed out when the chosen folder form carries no date at all - neither as a date folder nor as a date placeholder in the label. With no date in the name there'd be nothing to separate.
The day starts at 4:00 AM
Shooting through the night? With this option everything before 4:00 AM still counts towards the previous day. The concert from 22:00 to 01:30 stays one folder instead of tearing apart at midnight. The boundary is fixed at 4 a.m. It can't be changed.
The option only works together with One folder per shooting day - no days, no day boundary - and only changes which folder a shot goes into, never its file name.
The time in the file name stays real
If the 04:00 boundary puts a night shot into the previous day's folder, the file
still carries its true time. 2026-08-18_013000_… in the folder
2026-08-17_Concert is correct, not contradictory: the folder follows the
evening, the file name follows the clock.
Renaming files
The camera hands out names like IMG_0473. If you want meaningful names right at
import, switch on Rename files and give a pattern. The default is
{yyyy-MM-dd}_{HHmmss}_{filename} - which yields 2026-08-17_143012_IMG_0473.
The { } button shows the placeholders and inserts at the cursor; every menu
entry shows its result right next to it. The notation is the usual date notation you
know from Lightroom or Bridge - so you can combine the pieces freely and type forms
that aren't in the menu:
| Placeholder | Result |
|---|---|
{filename} |
original name without extension: IMG_0473 |
{###} |
running number, as many digits as hashes: 001 |
{yyyy-MM-dd} {yyyy} {MM} {dd} |
date, complete or in pieces |
{HHmmss} {HH} {mm} {ss} |
time, complete or in pieces |
The label (the folder name) uses the same vocabulary with two differences: it
adds {yy}, {MMM} and {yyyyMMdd}, while time, {filename} and counters are not
allowed - a time would make one folder per second, a file name one per image. The
dialog tells you right at the field instead of quietly building something wrong.
The placeholders come out the same on every installation: English notation, and
{MMM} writes the month as the English abbreviation (Aug). That's deliberate -
the same import hits the same folder on a machine running another language, instead
of creating a second one.
Upper and lower case are two different things
MM is the month, mm the minute. In the label the typo {yyyy-mm-dd} gets
caught immediately, because no time is allowed there. In the file pattern the
minute is legal - the mistyped pattern silently produces a name with the minute
in the month position.
Every name has to stay unique
Keep {filename} in the pattern - then every name carries its origin and can't
clash with another. If you'd rather number through, use a counter {###}. A
pattern with neither FlashView won't accept, because several shots would then
get the same name. Take the counter without {filename} and the number hangs on
the order on the card alone - a yellow hint points that out.
Importing twice doesn't renumber
The numbers follow what's on the card, not the copy run. Start the same import a second time and the same names come out - files already copied are skipped, nothing is assigned twice. A matching raw-JPEG pair counts as one shot here and shares a name, never two different numbers.
That holds as long as the card is unchanged: delete in the camera between two imports and the numbers behind the gap move up - the second run won't recognize those files and copies them again under new names. Patterns without a counter aren't affected.
What gets copied
Everything. Not just the images but video, sidecar files and whatever else the camera left behind. In the grid you'll only see what FlashView can display; the rest sits in the folder where it belongs.
Where a raw file and a JPEG belong to the same frame, they stay together, as do any sidecar files carrying ratings. When renaming too: the pair keeps the same new name with the matching extensions.
The card is only ever read. FlashView copies; it doesn't move anything and doesn't delete anything there - your card stays exactly as it was until you format it yourself.
Verifying the copy
Verify copy is on by default. FlashView calculates a checksum while copying, reads the written file back and compares. If something doesn't match, it tries up to three times.
It costs a little time and it's worth it: a loose USB card reader shows up during the import rather than weeks later when you open the file.
A file that fails all three attempts does not abort the import. At the end FlashView offers to retry the ones that failed.
You can safely run the import again
Files that are already there are skipped. If an import is interrupted, or you're not sure everything went through, simply start it again with the same settings - you won't get duplicates.
While the import runs
The target folder opens immediately and the pictures appear in the grid one by one while copying continues in the background. So you can start culling before the card has finished.
Eject card after import unmounts the card at the end, the same as the icon in the taskbar does. Nothing is written to the card for that either.
12 Editing
Once the culling is done, a handful of pictures are left that still want something: a touch brighter, a level horizon, a tighter frame. You don't have to leave FlashView for that.
E opens the editor - from the grid just as much as from the loupe. From the grid there's also Editing ▸ Edit in the context menu, or the Edit button in the toolbar, right next to Grid and Loupe.
Editing always applies to a single picture. If you come from the grid, FlashView switches to the loupe for it and puts you back where you started when you leave.
It makes no difference whether you're on a JPEG or a raw file. FlashView brings a full raw developer with it and gets what's in the file out of it: highlights and shadows hold far more latitude there than in a finished JPEG.

When you open editing, the filter bar steps aside and the tool bar takes its place. That's deliberate: editing is about one picture, not about picking from many - the same reason the folder tree disappears. Your filter stays set, you just don't see it.
The tools sit on the left - crop, straighten, redact and the two rotate buttons. Next to them, set apart in a recess of their own, you get the settings for whichever tool you picked. Save and Cancel close the session on the right. The moment there's something to save, Save turns blue - it's the one colored button on the bar, and so it doubles as the sign that something is still open.
Adjust, at the end of the tools, shows and hides the slider panel. The panel sits at the top right and holds brightness, color and sharpness. FlashView remembers whether it's open beyond the session - if all you do is crop, you keep the extra room for the picture.
Messages - "Edit loaded", "Saved: …" or a note when something didn't work - appear just below the bar. Notes fade on their own; errors stay until you carry on.
Your original stays as it is
This is the important part, and it's not what people expect: FlashView does not change your photograph.
What you set is stored as a recipe next to the original - a small file holding your values. A finished JPEG with the result is written alongside it. The original itself is never touched.
Which brings the pleasant part: you can reopen an edit at any time and keep going. Every calculation starts again from the original, so nothing accumulates. Straighten by five degrees today and by eight later, and the picture is rotated by eight - not by thirteen.
Which files appear
Saving puts two files next to your original. So IMG_00154.jpg gives you:
| File | What's in it |
|---|---|
IMG_00154.jpg |
your original, unchanged |
IMG_00154.jpg.fvedit |
the recipe: your settings, as text |
IMG_00154_edit.jpg |
the finished picture to hand on |
The one you hand on is the _edit.jpg. The recipe is only for FlashView - it's the
reason you can reopen and change the edit later.
Both companions belong to the original and travel with it when you copy, move or delete. Delete just the recipe and the edit is gone while the original stays.
Telling originals and edits apart
In the grid the original and the edited version sit next to each other, which gets in the way when you're culling. The edited button in the filter bar tidies that up: it shows either your results or your untouched material. How it cycles is described in Filtering and sorting.
In and back out
There are exactly two ways out of the editor:
- Save stores the recipe and the result and closes. E does the same.
- Cancel closes without saving. So does Esc - though in stages: if a tool is active, the first press only ends that tool.
Cancelling only discards what you changed in this session. An edit you saved earlier stays.
If you leave by some other route - double-clicking back to the grid, say - and there are unsaved changes, FlashView asks and offers three ways out: save, discard, or carry on after all.
Save copy
The drop-down next to Save holds Save copy. That creates an independent new picture in the folder with no further connection to the original.
You want that when two versions should stand side by side - color and black and white, square for Instagram and the original crop. The copy inherits the original's rating so it shows up in your filters.
The normal route stays Save: one edit, changeable at any time.
Taking it all back
To get rid of an edit completely you don't have to wind every slider back. The context menu has Remove edit under Editing: the recipe and the rendered picture disappear, and what's left is your photograph exactly as it was - JPEG or raw.
In the grid FlashView asks first and names the number of pictures involved. In the loupe it doesn't: there it's about the one picture in front of you, and Ctrl+Z brings it back. The menu route isn't final either - the recipe and the result go to the Recycle Bin.
13 Crop, straighten, redact
Three tools in the top bar change neither color nor brightness but the picture itself: the framing, the tilt, and the parts that are nobody's business.
Crop
Crop lays a frame over the picture. Drag with the mouse to place it, the eight handles on the edges and corners adjust it, and thirds guides help you line the subject up.
For a fixed aspect ratio pick one of the set ratios - 1:1, 4:3, 3:2, 16:9 or the original. A button of its own swaps portrait and landscape without you having to drag again; on the keyboard that's X.
The crop only takes effect when you click Apply. Until then the frame is just a proposal you can move around as much as you like.
Taking a crop back
Applied doesn't mean final: Ctrl+Z brings the full frame back. And even after saving you can still get at the whole picture - the original is untouched, so you simply reopen the edit.
Straighten
A tilted horizon jumps out at you, and levelling it by eye is tedious. Straighten turns the problem around: you drag a line along whatever should be horizontal or vertical - horizon, door frame, water line - and FlashView levels the picture to it.
For fine work there's a slider as well, and a grid overlay you can switch on.
Not to be confused with the two rotate by 90° buttons, one each way. They tip the picture between portrait and landscape and work losslessly: they write the orientation into the file rather than recalculating any pixels.
Rotating without opening the editor
When a whole series came out sideways because the camera didn't notice, going through the editor is the long way round. Mark the pictures in the grid and take Rotate from the context menu - the same two directions are there, and they apply to everything you marked at once. With nothing selected it acts on the current picture.
Redact
Sometimes something has to disappear: a number plate, a face in the background, a name on a sign. Redact drags a box over the spot. You can have several, and each one can be moved, resized and rotated - handy for a sign standing at an angle.
Three styles are available:
| Kind | Effect |
|---|---|
| Blur | smears the area, least conspicuous |
| Black | covers completely, visibly deliberate |
| Mosaic | coarse tiles whose size you set |
A slider sets the strength. To remove a selected box, press Delete.
In the output file it's permanent
Unlike brightness or color, redaction is baked into the JPEG that gets written. Whoever receives that picture cannot recover what was underneath - which is the whole point. For you it stays reversible as long as you're with your original and its recipe: nothing there has been changed.
14 The sliders
The sliders live on the right of the edit mode. There are deliberately few of them, and each does exactly one thing.
Whatever you set here is reversible. Your values sit as a recipe next to the original, and every calculation starts there again. So you can keep adjusting as often as you like without anything piling up - and go back to the untouched picture at any point.
Tone and color
| Slider | Effect |
|---|---|
| Brightness | the whole picture lighter or darker |
| Contrast | the gap between light and dark |
| Highlights | the bright areas only, for pulling back blown regions |
| Shadows | the dark areas only, for opening them up |
| Saturation | color intensity |
| Warmth | towards yellow or towards blue |
Highlights and shadows are the two that make the difference: they work at the ends rather than shifting the whole picture. A sky that's too bright comes down without the subject sinking into the dark.
Raw files add Tint, the second axis of white balance: it runs from green to magenta while warmth handles blue to yellow. Between them you can rescue shots taken under mixed lighting. JPEGs don't have that slider - there the white balance is already baked in.
Comparing before and after
Hold the Before button down and you see the starting point for as long as it's pressed. Let go and your edit is back. That's more reliable than memory, especially when you've talked yourself into a series of small steps.
Sharpen, structure and vignette
Sharpen works on fine edges, Structure on larger forms. For fur, feathers or fabric reach for sharpen; for landscape and architecture, structure.
On raw files FlashView applies a little of both from the start - a raw file is unprocessed and otherwise looks soft. Camera JPEGs stay at zero, because the camera has already sharpened them; going over that again would overcook it.
Vignette darkens the edges and draws the eye inwards. It only goes one way, into the dark. Over the first half of the slider the edge gets darker; over the second the effect reaches further towards the center of the frame.
Denoise
Two sliders, one for color noise and one for luminance noise. Color noise is the speckling in dark areas, luminance noise is the grain.
The Auto button takes the judgement off your hands: FlashView measures the actual noise in the picture and sets both sliders to match. From there you can adjust.
Denoising always costs detail
Noise and fine detail look technically alike. Denoise heavily and you lose fur, hair and the texture of fabric. Better to hold back - a little grain usually looks more natural than a picture that's been ironed flat.
Looks
A Look lays a finished color treatment over the picture, the way a film stock has a character of its own. FlashView ships six, among them Cinematic, Teal-Orange, Faded and Vivid.
The Strength slider underneath sets how far the look goes, so it can also be just hinted at.
With the black and white look that slider changes meaning: there it decides which color comes out bright in the conversion - like a color filter in front of the lens with black and white film.
Adding your own looks
FlashView reads color lookup tables in .cube format, the same ones video
software uses. Drop your files into the Luts folder under %AppData%\FlashView
and they'll be in the list next time you start. That's how you bring your own
style across from other programs.
Carrying settings over
You rarely edit just one picture. For the rest of a series there are two routes:
Everything that makes up the look of a picture goes by one word in FlashView: the style. That covers the look, its strength and every slider down to noise reduction, sharpening and vignette. What belongs to the single picture does not - crop, straightening and redactions always stay with the frame.
For the quick case in between: AltGr+C copies the style, AltGr+V pastes it onto the next picture. Both also sit in the context menu under Style. In the grid, pasting applies to the whole selection - so a series gets the same look in one go.
Because that hits many pictures at once, the grid asks first and tells you how many are affected and how many already carry a style that will be replaced. The loupe doesn't ask - there you see the result immediately, and Ctrl+Z takes it back.
For what should stick around: give the style a name in the Style field via Save as…, and it stays available from then on. Pick it and hit Apply to put it on the picture - as often as you like, including after you've nudged a slider in between. Behind the ▾ sit the rarer cases: Update writes your current values into the selected style, Delete throws it away.
A selected style stays in the field for the session. It does nothing on its own - you have to press Apply. It just saves you picking it from the list again on every picture.
Back to the start
Reset underneath the sliders clears the whole edit: sliders, crop, alignment and redactions. You're still in edit mode afterwards and can start again or save straight away.
Getting rid of the edit as a whole is a different thing: for that there's Remove edit in the context menu under Editing, which deletes the recipe and the result and leaves you with your photograph. Here too the grid asks before it touches more than one picture.
15 Developing raw files
Open a raw file for editing and FlashView calculates differently than it would for a JPEG. You won't notice: it's the same panel with the same sliders. The file decides, and there's no switch.
The difference is in what's being calculated. In a JPEG, white balance, contrast and color have already been fixed by the camera. In a raw file those decisions are still open, which is exactly why there's more to get out of it.
Which raw files
FlashView develops the raw formats of the common manufacturers: Canon (CR3, CR2), Nikon (NEF)*), Sony (ARW), Fujifilm (RAF), Olympus / OM System (ORF), Panasonic (RW2), Pentax (PEF), Samsung (SRW), Hasselblad (3FR, FFF), and DNG.
*) Nikon Z: lossless compressed only - see below.
Resolution is not a factor.
If FlashView finds something inside a file it cannot unpack, it does not refuse to edit. It carries on with the embedded camera JPEG instead - see "Camera JPEG at full resolution" below.
Don't confuse this with the file type filter: that counts TIFF among the raw files and hides it along with them, but a TIFF isn't developed - it already has been. The full list of what FlashView displays is in Filtering and sorting.
Finished before you touch a slider
The starting point is calibrated: exposure, contrast and color are set so the picture looks finished from the outset. The sliders move that starting point rather than building up from zero. Nobody going through two hundred frames from one shoot wants to construct each of them from scratch.
FlashView deliberately shows more than the camera's own JPEG does - the shadows in particular keep detail that others have already crushed. It holds back on contrast too. That's on purpose: you can always take away what's there, but you can't bring back what isn't.
Want it punchier? Two moves: Shadows down makes the darks solid again, Contrast up gives the picture as much bite as you like.
What the sliders do on a raw file
Most of them are named the same and feel the same. Three behave differently:
| Slider | On a raw file |
|---|---|
| Exposure | not brightness but stops, the way it works on the camera |
| Warmth | moves the actual white balance, not just the mood |
| Tint | the second white balance axis, green to magenta |
FlashView sets the black and white points itself - there are no sliders for those.
Getting the highlights back
This is where a raw file really earns its keep. A sky that's white and empty in the JPEG often still holds detail in the raw. Pull Highlights down and the clouds come back. On the JPEG of the same frame that area stays a white patch - there the information really is gone.
Raw stays fast too
A folder of raw files pages as smoothly as a folder of JPEGs, and the editor opens straight away as well. Nothing about working with them tells you that a raw file takes more calculating than a finished JPEG.
"Camera JPEG at full resolution" - what does that mean?
With some raw files, a brief note appears when you open them: Camera JPEG at full resolution. That is not an error message. It tells you what you are working on.
Every raw file carries a finished JPEG alongside the sensor data - the picture your camera shows on its screen. On most cameras that JPEG is full resolution, so 45 megapixels on a 45-megapixel camera. When FlashView cannot unpack a file's sensor data, it works from that JPEG instead of refusing to edit.
What this means for you:
- Resolution: unchanged. Crop, straighten, redact, looks, sharpening and export all work at full size.
- What you lose is raw latitude. Highlights and shadows won't come back as far as usual, and warmth is no longer a true white balance but a color shift on a finished picture.
The usual cause is a newer, heavily compressed raw format - Nikon's High Efficiency (HE and HE*) on the Z8 and Z9, for instance. That compression is licensed and is not part of the freely available libraries; other programs built on them hit the same wall.
The simplest fix: one compression setting
Switch your camera's raw recording from High Efficiency to lossless compressed. On Nikon bodies you'll find it in the shooting menu under raw recording, right next to image quality. FlashView will then develop your raw files in full - and not just FlashView: lossless compressed raw files can be read by practically every program, including the Windows preview.
It costs space. On a Z 9 that's roughly 50 instead of 30 megabytes per frame, about half again as much. In return you get the full raw latitude back and you don't depend on a single vendor - for pictures that should still open in twenty years, that's the quieter choice.
Note: this only affects future shots. It does nothing for files already sitting on your disk as HE.
For shots you already have
Convert them to DNG with the free Adobe DNG Converter - FlashView can develop that. It's an inelegant detour, but it's the same one users of other programs with this limitation take.
What gets saved
As with any edit, a recipe appears next to the raw file and a finished JPEG holds the result. The raw file itself is untouched.
So raw follows the same rule as JPEG: the edit is reversible and lossless. You can reopen a development at any time and keep working on it - months later, when you want to output the picture larger or you've changed your mind about the crop. It's always recalculated from the raw file.
16 Editing elsewhere
Some things FlashView can't do: remove a distracting object, retouch at length, work with layers. For those you hand the picture to Photoshop and get the result back - without having to think about files.
Handing it over
Right-click the picture in the loupe, then Editing ▸ Edit in Photoshop…. The entry names whichever editor FlashView found on your machine. It isn't in the grid - what goes over is always a single picture.
FlashView bakes your existing edit in, writes a PSD file next to the original and starts the editor with it. That takes a moment - the status bar tells you what's happening. Photoshop then needs its usual start-up time on top.
The menu entry only exists in the loupe, and only if an editor was found.
More than one editor
If FlashView finds several, each gets its own entry - Edit in Photoshop… with Edit in Reblum… below it. So you decide per picture where it goes: the full program with layers one time, the quick fix the next.
FlashView looks for Photoshop and Reblum. For anything else, list the paths under
externalEditorPaths in settings.json - your list then applies exactly, and
nothing is looked for automatically.
Getting it back
Here you do nothing at all. Save in Photoshop and FlashView notices by itself, converts the PSD once into something displayable, and shows you the result.
From then on the picture behaves like any other: paging, zooming, rating and filtering all run at the usual speed. The PSD is converted this one time only - while you were in Photoshop anyway.
As often as you like, and later too
You can reopen the PSD in Photoshop and save it as often as you want; FlashView follows every time. That even applies to PSD files that didn't come from FlashView: if one is sitting in the open folder and you edit it externally, the result shows up just the same.
What you click on decides
The menu entry behaves differently depending on which picture is open. Call it on
the PSD and that same file goes back to Photoshop - you carry on with your
version. Call it on the original and a second hand-over is created next to
it, an _ext2.psd. Both are intended; you just want to know which one you're
doing.
Which files appear
IMG_0001.jpg becomes IMG_0001_ext.psd when you hand it over. The _ext stands
for "externally edited". Next to it FlashView puts the converted version as
IMG_0001_ext.psd.jpg.
In the grid you see one entry for that: the PSD, shown with the contents of its converted version. Your original stays where it was, unchanged, with its own edit.
If an _ext.psd already exists, an _ext2.psd appears - an existing version is
never overwritten.
Editors that can't read PSD
Not every program handles PSD - Reblum, for instance, doesn't. Such an editor
gets a single JPEG instead of a PSD plus converted version, IMG_0001_ext.jpg,
and writes back into it when you save. Nothing changes for you in the flow;
there's simply one file fewer in the folder.
This assumes the program really does write back into that file. Some editors would rather save into their own format - then nothing comes back, and you need to save as JPEG over the handed-over file as well.
A second picture, not a replacement
After handing over, FlashView jumps to the new entry, because that's where you'll be working. The original doesn't disappear. So you have both versions in the folder and can decide later which one you pass on.
What you can do with the result
Viewing, zooming, rating, filtering, exporting and rotating all work as usual. For the file type filter a PSD doesn't count as raw: it's visible under all formats and under no RAW, because it didn't come out of a camera.
You can also edit it like any other picture - with E and the same sliders. The same rule applies as everywhere else: your settings go into a recipe next to the file, the file itself is untouched, and everything stays changeable. That already holds when all you want to do is rotate it.
In Explorer you'll then see a file with the extension .fvedit appear - that's the
recipe, a small text file holding your settings. It belongs to the picture and
travels with it during file operations.
The edited button in the filter bar covers externally edited pictures too - as far as it's concerned, edited is edited, wherever it happened.
17 The whole route: from card to client
The chapters before this one explain each feature on its own. This one shows how they fit together - from the moment the card comes out of the camera to the files that land with your client.
Seven stations
| Station | What happens | Chapter |
|---|---|---|
| 1. Read the card | the whole card into a dated folder, verified | Getting pictures off the card |
| 2. Overview in the grid | the folder is open immediately, the shoot is in front of you | Your first folder |
| 3. Detail in the loupe | one picture full size, a click on the eyes checks the focus | Zoom and checking focus |
| 4. Culling | pick, reject, stars - one key per decision, auto-advance pages for you | Rating and marking |
| 5. Narrowing down | filter to whatever should be left | Filtering and sorting |
| 6. Editing | brightness, crop, horizon - and the full development for raw | Editing, Developing raw files |
| 7. Handing over | export as fresh JPEGs, or copy the files as a set | Files, clipboard and export |
The card import opens the target folder straight away and fills it while copying continues in the background, so stations 1 and 2 run into each other. You start culling before the card has finished.
Where the time actually goes
Of those seven stations, one takes the lion's share: the culling. Looking at two thousand frames from a wedding isn't the problem - you page through them quickly enough. The problem is that most programs stall while you do, and half a second of waiting per picture turns into twenty minutes of pure waiting across two thousand frames.
That's precisely where FlashView comes in. The next picture is there when you press the arrow key, on raw files too, and in the thousands. With auto-advance it becomes a single motion: look, key, look, key.
The quickest pass
First go through the whole shoot with P and X only - in or out, nothing else. Then set the reject filter to rejects only, press Ctrl+A and Delete. What's left goes into a second round with stars. Two quick passes are more reliable than one in which you decide everything about every frame at once.
What becomes of a picture
From station 6 onwards it pays to keep track of the files. One photograph can turn into four things, and each has its purpose:
| File | What for |
|---|---|
IMG_0042.CR3 |
your original - never touched |
IMG_0042.xmp |
stars, color label, pick - readable by Lightroom and Bridge too |
IMG_0042.CR3.fvedit |
the recipe of your edit, changeable at any time |
IMG_0042_edit.jpg |
the finished picture |
When it comes to handing things over you have two routes, and they mean different things:
- Export creates new JPEGs at the size and quality you choose, without metadata. That's the version for the client, for the web, for the print lab.
- Copy to folder takes the files themselves, ratings and recipe included. That's the route when a set of pictures needs to move - into the archive, onto an external drive, into a shared folder.
Carrying on in Photoshop, if you want to
With some pictures you'll want to go a step further after editing in FlashView: remove a distracting object, retouch at length, work with layers. For that there's the route out and back - Edit in Photoshop… in the loupe's context menu, under Editing. FlashView hands over a PSD with your edit baked in and picks your result up by itself as soon as you save. There's more in Editing elsewhere.
After that everything carries on as usual: the result sits in the same folder and can be rated, filtered, edited further and exported.
The route stands on its own
From card to client you can get there with FlashView alone - reading in, culling, developing and outputting are fully covered, for JPEG as much as for raw. Anyone who also uses an image editor brings it in for the handful of pictures where it's worth it; FlashView works with it rather than getting in its way.
18 Settings
You reach the settings through the cog on the right of the toolbar. Most of the defaults suit most people - what follows are the ones worth a look.
What a folder starts with
Under Folder you set what a newly opened folder begins with: whether Recursive is on, what the Group depth is, and what it sorts by - name, date or one of the other criteria, ascending or descending. Name ascending is alphabetical order; capture date descending puts your newest pictures first.
These are starting values. As soon as you change something within a folder, FlashView remembers it for that folder - the setting here only applies to folders you open for the first time.
Grid
Columns decides how many pictures sit side by side. Auto adapts to the window width; while you're working, Ctrl+scroll is quicker.
Thumbnail controls how finely the previews are calculated:
| Level | Edge length | What for |
|---|---|---|
| Performance | 320 px | frugal, for older machines |
| Standard | 480 px | the default |
| Hi-Res | 640 px | crisper tiles at better compression, more work and more disk space |
On the very first start FlashView picks to suit your machine: Performance on a weaker one, Standard otherwise.
Which level suits you also depends on your column count: lots of narrow tiles don't need a high resolution. Show few large tiles on a high-resolution monitor with the processing power to match, and Hi-Res shows you noticeably more.
Metadata
Enable EXIF sort & filter unlocks the camera facets: only with it can you filter by camera, lens or ISO and sort by capture date instead of file date.
Only with this setting does the EXIF filter appear in the filter bar at all - without it, it's hidden.
It costs no speed; the values are picked up during the scan that runs anyway. It's still off by default, because it only matters to photographers who care.
Color labels compatible with decides what language color labels are written in. Lightroom (German localization) suits the German build of Lightroom; the other setting suits Bridge and other English-language programs. If your color labels turn up elsewhere as a plain white flag, this is why - reading, FlashView understands both spellings anyway.
File association
Register makes FlashView visible in Explorer's Open with menu - for every format it can display, raw files and PSD included. Which ones those are is listed in Filtering and sorting under "What FlashView shows".
You can have that done during installation; here you can do it afterwards - if you're running the version without an installer, if you skipped it during setup, or if the associations got lost later. It applies to your Windows account; on a shared machine everyone has to do it for themselves. Unregister takes the entry out again.
Your default programs stay as they are
FlashView only adds itself to the list of choices; it doesn't take the association away from anything. Double-clicking a NEF still opens whatever you set for it - FlashView is simply there under Open with from now on. If you do want it as the default, you set that in Windows as usual.
The place it helps most is PSD: Windows has no decoder of its own for it, so the format usually sits empty in the Open with menu and a double-click starts Photoshop. FlashView shows the picture straight away.
Compare and slideshow
For Compare you set two starting values: which side the candidate begins on - the right by default, which puts the reference on the left - and whether zoom and pan on the two sides are coupled from the outset. Both can be changed at any point during a comparison.
The slideshow interval decides how long a picture stays up. That's a starting value too: you can change the pace directly while a slideshow is running.
Cache
FlashView stores the previews it has calculated so a folder is there instantly the second time you open it. Here you can see how big that cache currently is, and clear it or move it somewhere else - onto a faster disk, or one with more room.
Clearing costs nothing but processing time: the previews are rebuilt next time you open a folder, and your pictures and ratings aren't affected. If a folder is open at the time, the cache starts filling again straight away.
Clearing out is worth it in two cases: when a lot of folders have accumulated that you no longer need and space is getting tight - or after you've changed the thumbnail resolution, because the old sizes are still sitting there.
Cloud folders
If your pictures live in OneDrive, Dropbox or Nextcloud, they're often not really on your disk but fetched on demand. Cloud thumbnails decides how FlashView handles that:
| Setting | Behavior |
|---|---|
| Off | fetches nothing on its own; the grid shows a cloud icon and loads only when you open a picture |
| Preview | fetches the first few images when you open a folder, the rest on click |
| Load all | fetches everything as you scroll |
With Preview, a Preview count appears underneath - a dropdown offering 2, 4, 6, 8 and 12. The default is four.
The default protects your connection
Load all defeats the point of cloud storage if you're deliberately not keeping a local copy - with a folder of a thousand pictures, FlashView will pull a thousand files onto your disk. Preview is the middle ground: enough to find your way around, and you fetch the rest on purpose.
Other
Single window makes FlashView close any other running windows when it starts. Anyone who likes having two folders open side by side leaves it off.
Restart tour runs the short introduction that appears the first time you open a folder once more.
19 License and updates
FlashView runs for 60 days after installation, in full, with no restrictions and no watermark. After that you need a license key.
Everything to do with it sits in the about window: the ℹ on the right of the toolbar, next to the cog. That's where you'll find your version, your license status and the four buttons this chapter is about.
What the status tells you
The line under the copyright says where you stand:
| Display | Meaning |
|---|---|
| Demo: 42 days remaining | trial period, full functionality |
| Lifetime license for v1.x | a purchased license, valid indefinitely |
| Press license valid until … | a time-limited license, for press or testing |
When the trial is running out, FlashView tells you in good time - with a note at startup during the last few days.
Buying
Buy opens the shop on flashview.net in your browser. After the purchase your
license key arrives by email, in the form FV-XXXX-XXXX-XXXX-XXXX.
Keep that email. It's the only place the key exists, and you'll need it again when you move to another machine.
Activating
Activate license opens a small window for your key. Click Activate, FlashView checks with the server and stores a certificate holding your license on your machine - done. The status in the about window changes immediately and your name appears above it.
For that, the machine needs the internet once. Not afterwards: the certificate is local and is checked at every start without a connection.
The license belongs to the machine and the account
Activating ties the certificate to this machine and your Windows account. Simply copying it to another machine won't work - it can't be read there. The way to move is below.
A purchased license is valid indefinitely for the major version you bought it for, including every update within it. It also opens older versions, so a v2 license will start a v1 as well.
Moving to another machine
Your license isn't chained to one device. For a change - new machine, a fresh Windows install, laptop instead of desktop - there are two routes.
The clean route: release it first. While the old machine is still running, open the about window there and click Release license. FlashView asks once; after that the slot is free. On the new machine you enter the same key and everything is as it was.
The route for when the old machine is gone. Just enter the key on the new machine. FlashView notices that the license is still registered elsewhere and offers Move to this machine. One click, and the old slot is released.
Releasing isn't cancelling
Release license doesn't take anything away from you - it only signs this one machine off. With the key from your purchase email you can activate again at any time, here or anywhere else. Which is exactly why that email is worth keeping.
The second route is the more convenient one, but it should stay the exception: it's limited in number, so a single key can't wander round an unlimited number of machines. If you regularly switch between two computers, release each time instead - that costs nothing and works without limit. If it does run out, an email to support will sort it.
Updates
FlashView checks once a day whether a newer version is out. If there's an update, a note with the version number appears at startup.
Update & restart handles the rest on its own: download, signature check, install, restart. You don't have to fetch anything from the website or install anything by hand. Your settings, ratings and edits are untouched by it.
If you're impatient, use Check for updates in the about window. The button then either says Up to date or offers you the update.
20 All keyboard shortcuts
FlashView is built around the keyboard - when you're going through large numbers of pictures, every hand movement you save counts.
The short version is always to hand
F1 or ? brings up an overview of the most important shortcuts inside the program. Esc or a click beside it closes it again. This page is the complete version for looking things up.
Viewing and paging
| Key | Action |
|---|---|
| ← → | previous / next image |
| Home End | first / last image |
| Enter | open the image, close the image |
| G | grid view |
| L | loupe |
| F | fullscreen |
| Esc | back one step |
| S | start and stop the slideshow |
| F11 | loupe on the second monitor |
| scroll wheel | change image (loupe) or scroll (grid) |
| Ctrl+scroll | zoom (loupe) or tile size (grid) |
Rating and marking
| Key | Action |
|---|---|
| 0-5 | set stars, 0 clears |
| 6 7 8 9 V | color label red, yellow, green, blue, purple |
| P | pick |
| X | reject |
| U | clear marks |
| R | show and hide the rating bar |
| Caps Lock | turn auto-advance on and off |
| Ctrl+Z | undo the last rating |
The number keys work on the numeric keypad too.
Selecting and files
| Key | Action |
|---|---|
| Ctrl+A | select all visible images |
| Ctrl+D | clear selection |
| Ctrl+click | add a single image to the selection or take it out |
| Shift+click | extend the selection to here |
| Delete | move to the recycle bin |
| Ctrl+C | copy image to the clipboard |
| Ctrl+Shift+C | copy file path to the clipboard |
| Ctrl+O | open folder |
| Ctrl+E | export |
| Ctrl+I | import from card |
| F5 | re-read the folder |
Filtering, sorting, searching
| Key | Action |
|---|---|
| Ctrl+F or F3 | open search |
| Shift+O | sorting |
| Shift+D | date filter |
| Shift+E | EXIF filter |
| Shift+J | file type: all, no RAW, RAW only |
| Shift+R | turn recursive on and off |
Folders and display
| Key | Action |
|---|---|
| T | focus the folder tree |
| Shift+T | show and hide the folder tree |
| Tab | switch between folder tree and image area |
| Ctrl+← → ↑ ↓ | drive the images while focus stays in the folder tree |
| I | EXIF panel |
| H | histogram |
| F1 or ? | shortcut overview |
With Ctrl the keys do what they do in the image area without it: in the grid the selection moves (including Page Up, Page Down, Home and End), in the loupe ←/→ page through the images and Home/End jump to the first or last one.
Skim many folders without switching views
Put the focus in the folder tree with T and walk from folder to folder with ↑/↓ - every selected folder loads right away. With Ctrl+←/→ you page through its images on the side, without leaving the tree. That is the quickest way to get an overview of many shooting days and drill into the right one - no mouse, no Tab, no G/L.
In the grid this works right away. In the loupe the folder tree is hidden by default - one Shift+T brings it in, and from then on you page through the large images while standing in the tree.
Compare
| Key | Action |
|---|---|
| C | compare on and off |
| ↑ | candidate becomes reference |
| ↓ | candidate and reference swap |
| Shift+C | switch the active side |
Editing
| Key | Action |
|---|---|
| E | open the editor, and close it saving |
| Ctrl+S | same as E: save and close |
| Esc | cancel without saving |
| Ctrl+Z | undo the last step, a crop for instance |
| X | swap portrait and landscape (while cropping) |
| Delete | remove the selected redaction |
The style - the look and every slider - can travel from picture to picture, and that works everywhere, not just in edit mode:
| Key | Action |
|---|---|
| AltGr+C | copy the style |
| AltGr+V | paste the style, in the grid onto the whole selection |
On keyboards without an AltGr key, Ctrl+Alt does the same - Windows reports both as the same combination.
21 Appendix: Environment variables
A few settings can't be changed inside the program - you pass them in when you start it. These are special cases; for everyday use you'll never need this page.
| Variable | Effect |
|---|---|
FLASHVIEW_NO_TELEMETRY=1 |
Turns off the anonymous usage count. The check for new versions still runs, but reports only the program version and creates no identifier. |
FLASHVIEW_LANG=en or de |
Forces the language of the interface, whatever Windows is set to. |
FLASHVIEW_APPDATA=<folder> |
Puts settings, cache and log into a different folder. This lets you run FlashView from a USB stick without leaving traces on the machine. |
How to pass a variable
Open PowerShell in the folder that holds FlashView.exe and set the variable
before starting. It applies to that one window only - close PowerShell and
everything is as before. This example starts FlashView in German:
powershell
$env:FLASHVIEW_LANG = "de"
.\FlashView.exe
To make it permanent, use Control Panel → System → Advanced system settings → Environment Variables.
If a variable isn't set, FlashView behaves as usual. A typo in the name does no harm - the setting simply isn't found.